By Emmett Caldwell
A solar powered hot water system uses a collector to capture sunlight and transfer that heat into water, which is then stored in a tank until you need it. Done right, a well-sized system can cover a large share of your hot water needs during the sunny months and reduce the work your backup heater does the rest of the year. This guide walks through how these systems work, how to size and site one, the materials involved, and the mistakes that cause most early failures.
How a Solar Powered Hot Water System Works
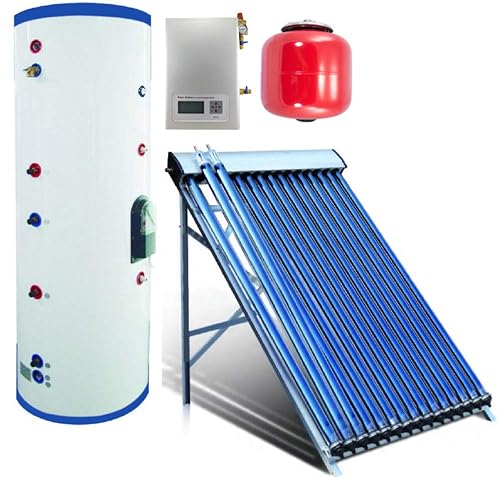
Every solar powered hot water system has three core jobs: collect heat, move it, and store it. The collector absorbs solar radiation, a heat-transfer fluid or the water itself carries that energy, and a storage tank holds the heated water for later use. Most residential systems also include a backup heater, either electric or gas, that engages when the sun is not enough.
Shopping for one? See our guide: 8 Best Solar Hot Water System Off Grid Picks for Homes (2026).
Systems fall into two broad families. In direct (open-loop) designs, potable water flows through the collector. In indirect (closed-loop) designs, a non-freezing fluid, usually a glycol mix, circulates through the collector and passes heat to the water through a heat exchanger. Indirect systems are common in climates that see freezing temperatures, while direct systems are simpler and suit warm, frost-free regions.
Circulation can be passive or pumped. Thermosiphon systems rely on hot water rising naturally, which is why the storage tank sits above the collector. Pumped systems use a small circulator controlled by a differential controller, which compares the collector temperature with the tank temperature and runs the pump only when the collector is hotter. For more on natural circulation, see Thermosiphon Solar Water Heaters: Natural Circulation Explained.
Step 1: Estimate Your Hot Water Demand
Sizing starts with knowing how much hot water your household uses. A common planning assumption in the US is roughly 15 to 25 gallons of hot water per person per day, but your actual number depends on habits, fixtures and appliances. Work through a simple tally: showers at about 2 gallons per minute with low-flow heads, dishwasher cycles, clothes washer loads, and sink use.
Once you have a daily figure, you can estimate how much of it the solar side should cover. Many designers aim for 50 to 80 percent of annual hot water demand from solar, with the remainder left to the backup heater. Aiming for 100 percent solar in winter usually means an oversized system that wastes heat in summer. For a worked method, read How to Estimate Your Household Hot Water Needs Before Going Solar.
Step 2: Assess Your Site
Your collector needs direct, unshaded sun for most of the day, and it should face close to true south in the Northern Hemisphere (true north in the Southern). Tilt generally works well near your latitude, though many installers adjust it for seasonal demand. Check for shading from trees, chimneys and neighboring buildings across the full year, not just at midday in June.
Check the roof or mounting area for structural capacity, wind loading and access. The collector and a full storage tank can weigh several hundred pounds, so structure matters. Measure the run between collector and tank, since long pipe runs lose heat and add friction. The guide on Site Assessment for a Solar Water Heater: Sun, Shade, Roof and Space covers these checks in detail, and Roof and Structural Safety for Solar Water Heaters covers load and fastening.
Step 3: Choose Collector and Storage Types
Three collector types dominate residential use. Flat-plate collectors are durable and affordable for their output and handle a range of climates well. Evacuated-tube collectors perform better in cold or cloudy conditions because the vacuum reduces heat loss. Batch (integrated collector storage) units combine collector and tank in one housing and are simple, but they lose heat quickly overnight in cold weather. Compare options in Solar Water Heater Collectors: Batch, Flat Plate and Evacuated Tube.
For storage, match tank volume to your daily demand, typically one to one and a half days of use for a residential system. Insulation thickness, tank material and built-in heat exchangers all affect performance. See Solar Hot Water Storage Tanks: Sizing, Types and Safety Parts for sizing and safety hardware.
Step 4: Gather Materials and Tools
Whether you buy a complete kit or assemble components, a typical installation needs the following:
- Solar collector(s), mounting rails, and roof or ground hardware rated for your wind and snow loads
- Storage tank with insulation and the correct inlet and outlet ports
- Copper or CPVC/PEX piping rated for the temperatures and pressures involved, plus insulation for all exposed runs
- Circulator pump and differential controller with collector and tank sensors (for pumped systems)
- Expansion tank, pressure relief valve, check valves and air vents
- Thermostatic mixing valve or tempering valve to limit delivered water temperature
- Heat-transfer fluid and fill equipment (for closed-loop systems)
- Tools: pipe cutters, solder or press tools, torque wrench, roofing sealant, multimeter, pressure gauge
Plan your materials list before buying. Insulation quality and pipe sizing are where shortcuts most often cause efficiency losses later.
Step 5: Install the Collector and Plumbing
Mount the Collector
Fasten mounts into rafters or structural members, not just roof sheathing. Seal every penetration with flashing rated for the roof type. Keep the collector array level across rows and maintain manufacturer-specified spacing so one row does not shade another.
Run and Insulate Piping
Keep runs short and slope lines so air and steam can escape. Insulate every pipe, including fittings, with UV-resistant insulation outdoors. Support lines so they do not sag, and use expansion loops where the manufacturer requires them.
Install Safety Components
Install the pressure relief valve on the tank as specified and route its discharge to a safe location. Add an expansion tank in closed systems, and fit a tempering valve so delivered water stays at a safe temperature. The safety discussion in Pressure and Temperature Safety in Solar Water Heaters is worth reading before you finalize the layout.
Step 6: Commission and Test the System
Before closing walls or covering the collector, pressure test the plumbing at the rated pressure for the system, typically with air or water as the manufacturer specifies. Check every joint for leaks. For closed-loop systems, fill and purge air completely, then confirm the glycol concentration with a refractometer. Set the differential controller’s on and off temperature differences as the controller manufacturer specifies, and verify that sensors read correctly under a warm collector.
Common Mistakes to Avoid
- Undersized or oversized storage. Tanks that are too small run out early; tanks that are too large never reach useful temperature.
- Skipping the tempering valve. Solar tanks can exceed safe tap temperatures on sunny days.
- Poor insulation on pipes. Exposed runs can lose a surprising share of collected heat.
- Ignoring water quality. Hard water scales heat exchangers and collectors. See Water Quality and Scaling in Solar Water Heaters.
- Forgetting freeze protection. Any system in a freezing climate needs a freeze strategy. Winterizing a DIY Solar Water Heater: Freeze Protection Options explains the options.
- Wrong controller settings. Poorly set differentials cause the pump to cycle constantly or never run.
Recommended gear
A few items make installation and monitoring easier. Choose components rated for your system’s temperature and pressure range.
- Refractometer for glycol checks: lets you confirm freeze protection in closed-loop systems without guessing. View on Amazon
- Digital pressure gauge: useful during pressure testing and when checking expansion tank pre-charge. View on Amazon
- Pipe insulation with UV-resistant jacket: protects exposed outdoor runs from heat loss and sun damage. View on Amazon
- Pipe cutter and deburring tool: clean, square cuts make leak-free joints easier to achieve. View on Amazon
Tips for Long-Term Performance
- Check glycol concentration and system pressure at least once a year.
- Clean collector glazing when dust or pollen builds up, especially in dry regions.
- Log tank temperatures for a few weeks after installation to confirm the system behaves as expected.
- Flush or descale the system on the schedule your water quality calls for.
FAQ
How much of my hot water can a solar powered hot water system supply?
Most residential systems can supply a majority of annual hot water demand, often in the range of 50 to 80 percent depending on climate, system size and usage. Output is highest in summer and lowest in winter, so a backup heater is still needed.
Do solar water heaters work on cloudy days?
They still collect some heat under diffuse light, but output drops significantly. Evacuated-tube collectors generally perform better than flat-plate models in overcast conditions.
Can I build a solar powered hot water system myself?
Many homeowners build or assemble simple systems, and the principles are well documented. However, electrical work, structural mounting and any gas connections should be handled by a qualified professional, and local codes may require permits and inspection.
Do I need a pump?
Not always. Thermosiphon designs circulate water without a pump, but they require the tank to sit above the collector. Pumped systems give more layout flexibility but need power and a controller.
What temperature should my hot water be set to?
Many households set the delivered temperature around 120 degrees Fahrenheit, with a tempering or mixing valve limiting the output at the fixture. Check local guidance and fixture requirements, and consult a professional if you are unsure.
How long do solar water heater components last?
Collectors and tanks often last a decade or more, while pumps, controllers and seals may need replacement sooner. Maintenance and water quality strongly influence lifespan.
Is a permit required?
Requirements vary by location. Many jurisdictions require permits for roof mounting, plumbing and electrical connections. See Solar Water Heater Codes, Permits and Professional Review and consult your local building department or a licensed professional.
Conclusion
A solar powered hot water system can meaningfully reduce your reliance on a conventional water heater when it is sized, sited and installed with care. Start with a clear estimate of your demand, confirm the site receives strong sun, and choose collector and storage types that fit your climate. Pay close attention to insulation, safety valves and freeze protection, and check the system regularly once it is running.
Ready to choose one?

About Emmett Caldwell
Emmett covers solar water heaters, comparing specs, features and long-term owner feedback to help readers choose with confidence.