By Emmett Caldwell
An apricus solar hot water system is a solar thermal setup built around Apricus collectors, which are evacuated tube panels that heat water or a heat-transfer fluid using sunlight. In this guide you will learn how the system works, how to estimate the size you need, how to plan the site, and what to check during installation. You will also see the common mistakes that cause poor performance, so you can decide whether a system like this fits your home.
Before you start, keep in mind that solar water heating involves pressurized water, high temperatures on the roof, and roof loading. Installation rules vary by location, and many jurisdictions require a permit or a licensed installer for work on the plumbing or roof. If anything in this guide is unclear for your situation, consult a licensed plumber, solar installer, or your local building department.
How an Apricus Solar Hot Water System Works
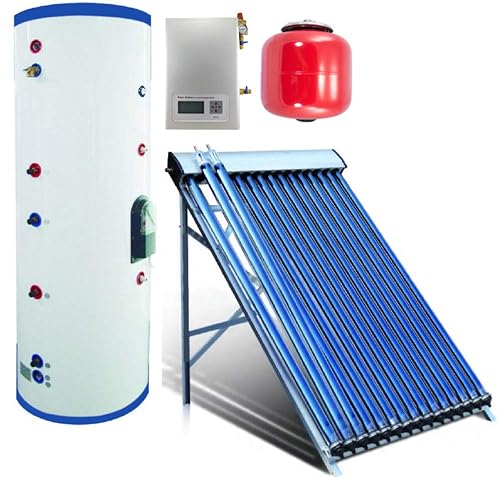
The core of the system is a set of evacuated tube collectors. Each tube has an inner absorber tube coated with a selective surface that captures solar energy and resists losing heat back to the air. The vacuum between the inner and outer glass tubes acts as insulation, which lets the collectors keep working on cold, windy, or overcast days better than a basic flat plate collector would.
Heat moves from the collectors to the storage tank in one of two ways. In a direct (open-loop) system, potable water flows through the collectors and into the tank. In an indirect (closed-loop) system, a glycol-water mixture circulates through the collectors and a heat exchanger transfers the heat into the tank. Closed-loop designs are common in freezing climates because the antifreeze protects the collectors, and they are generally preferred where water quality is poor.
A controller measures the temperature at the collector and at the bottom of the tank. When the collector is meaningfully hotter than the tank, the controller runs the pump. When the difference drops, it stops. This is called differential control, and it is the logic that keeps the system from pulling heat out of a tank that is already warm. For more on how that logic is set up, see Solar Water Heater Controls and Sensors: How Differential Control Works.
Step 1: Estimate Your Hot Water Demand
Sizing starts with how much hot water your household actually uses, not with the roof area. Measure or estimate your daily use in gallons (or liters) at your target delivery temperature. A common planning figure for a household shower is roughly 15 to 25 gallons per person per day, but your own habits matter more than averages. Count dishwashing, laundry, and any other fixtures.
Once you have a daily total, you can work out how much storage and collector area to aim for. For a practical walkthrough of this calculation, read How to Estimate Your Household Hot Water Needs Before Going Solar.
Quick sizing checklist
- List every hot water fixture and estimate daily use in gallons.
- Add a margin for guests, seasonal variation, and cloudy stretches.
- Note the cold inlet temperature for your area, which is usually lowest in winter.
- Decide whether you need full solar coverage or a supplement to a backup heater.
- Check the storage tank volume against your daily demand and your backup plan.
Step 2: Assess the Site
The collectors need strong, unshaded sun for as much of the day as possible. In the Northern Hemisphere, a south-facing roof with a tilt close to your latitude generally performs best. East or west orientations still work, but they usually deliver less energy over the year. Trees, neighboring buildings, and chimneys can all cast shadows that reduce output, so check the roof at different times of day across the seasons.
Structural capacity matters too. Filled collectors and a full tank add significant weight, and the mounting hardware must transfer that load safely into the roof framing. Look at the roof covering, the age of the shingles, and the condition of flashing before you commit to a location. For a fuller checklist, see Site Assessment for a Solar Water Heater: Sun, Shade, Roof and Space and Roof and Structural Safety for Solar Water Heaters.
Site checks before installation
- Record the roof azimuth and pitch with a compass and inclinometer or phone app.
- Photograph the roof and surroundings at morning, midday, and late afternoon.
- Confirm the roof framing can carry the loaded weight, with a structural engineer if unsure.
- Plan the pipe run from the roof to the tank, keeping it as short and insulated as possible.
- Identify where the storage tank will sit and whether the floor and drainage can handle it.
Step 3: Choose Storage and Controls
The storage tank holds the heated water until you need it. Pressurized tanks are common in systems meant to supply household fixtures directly, while unpressurized (open) tanks may be used with a separate pressure arrangement. Tank sizing, insulation rating, and the presence of an electric or gas backup element all affect performance.
Controls are where many homeowners get stuck. A proper differential controller with temperature sensors, a circulation pump, and safety features is essential. Choose components rated for the temperatures your collectors can reach on a hot, still day, which can exceed the boiling point of water in the absence of flow. For more detail on tank types and safety parts, see Solar Hot Water Storage Tanks: Sizing, Types and Safety Parts.
Step 4: Plan the Piping and Insulation
Piping losses can eat into your gains, especially over long runs. Keep the distance between the collectors and the tank short, use pipe sized for the flow rate your pump delivers, and insulate every exposed section with UV-resistant insulation outdoors. Use materials rated for the temperatures involved, and avoid restricting flow with unnecessary fittings or sharp bends.
If you are using a closed loop, label the lines and confirm the glycol concentration matches the freeze protection you need for your region. For piping materials and layout in more depth, read Piping for Solar Water Heaters: Materials, Insulation and Layout.
Step 5: Install the System Safely
Mount the collectors according to the manufacturer’s instructions, using rails and flashings rated for your roof type. Seal every penetration carefully, because roof leaks are one of the most common and expensive problems with rooftop solar. Fill and purge the loop to remove air, then pressure test the system before insulating the lines.
Install a temperature and pressure relief valve on the tank and confirm the discharge line runs to a safe location. Add a tempering or thermostatic mixing valve at the fixtures if you want to limit scalding risk, since stored water can get very hot. For settings and recommendations, see Preventing Scalding From Solar Hot Water: Tempering Valves and Settings and Pressure and Temperature Safety in Solar Water Heaters.
Tools and supplies to have on hand
- Torque wrench and sockets for rail and clamp hardware
- Pipe cutter, deburring tool, and PEX or copper fittings as specified by the system
- Pressure gauge and test pump for leak testing
- Multimeter for checking sensor and pump wiring
- Roof sealant and flashing kit approved for your roof covering
- Glycol and fill station, if using a closed loop
Step 6: Commission and Monitor
After installation, verify the controller reads sensible temperatures at the collector and tank, confirm the pump starts when the differential threshold is met, and check that it stops when the tank catches up. Watch the system on a sunny day and note the temperature rise. Over the first few weeks, check for leaks, air in the loop, and any alarms on the controller.
If the system underperforms, the cause is often a sensor placed wrongly, a pump running at the wrong speed, or a loop that still contains air. Temperature complaints are common enough to have their own troubleshooting guide: Solar Water Heater Temperature Problems: Too Cold or Too Hot.
Factors That Affect Performance
| Factor | Effect on output | What to do |
|---|---|---|
| Shading from trees or buildings | Reduces collector gain, sometimes sharply | Trim vegetation or relocate the array |
| Roof tilt and orientation | Changes seasonal and annual yield | Match tilt to latitude where practical |
| Long, uninsulated piping | Heat losses before water reaches the tank | Shorten runs and insulate fully |
| Water hardness | Scale buildup in direct systems and heat exchangers | Consider treatment or a closed loop; see the water quality guide |
| Sensor placement | Incorrect control decisions | Mount sensors per manufacturer specs |
Water quality deserves attention in hard-water areas. Scale can build up in heat exchangers and piping over time, and it reduces heat transfer. For a deeper look, read Water Quality and Scaling in Solar Water Heaters.
Common Mistakes
- Undersizing storage. A small tank can run out of hot water on heavy-use mornings even when the collectors are performing well.
- Skipping the pressure test. Small leaks in fittings can become large problems once the loop is hot.
- Leaving insulation off exposed pipe. Uninsulated outdoor runs lose heat quickly and can freeze.
- Ignoring roof structure. Loading a roof without checking framing capacity is a serious safety risk.
- Setting temperatures too high. Without a mixing valve, stored water can scald, so set limits deliberately.
- Overlooking local codes. Permits and inspections exist for good reasons. See Solar Water Heater Codes, Permits and Professional Review.
Tips for a Smoother Installation
Plan the whole system on paper before buying parts, including the pipe route, tank location, and controller wiring. Photograph every stage of the installation so you can trace problems later. Keep the manufacturer’s manuals, warranty terms, and wiring diagrams in one place. If you are comparing system types or sizes before buying, 8 Best Solar Hot Water System Off Grid Picks for Homes (2026) offers a useful overview of the options on the market.
If you are new to solar thermal, you may want to start with a small project before committing to a full household system. Small Solar Water Heating Demonstration Projects: Learning Safely covers low-risk ways to learn the principles first.
Recommended gear
These items help with planning, testing, and safe installation of most rooftop solar hot water setups.
- Digital inclinometer or angle finder. Measuring roof pitch accurately is the first step in site planning, and a reliable tool keeps the numbers honest. View on Amazon
- Digital pressure gauge with test kit. A gauge rated for the test pressure lets you confirm the loop holds before insulating. View on Amazon
- Infrared thermometer. It helps you check pipe and tank surface temperatures during commissioning. View on Amazon
- Torque wrench set. Correct torque on rail and clamp hardware keeps the mounting secure over time. View on Amazon
FAQ
What does the name apricus solar hot water system refer to?
It generally refers to a solar thermal system built around Apricus evacuated tube collectors, paired with a storage tank, pump, and controller. The exact components depend on the model and configuration chosen.
Do I need a permit to install one?
Often yes, especially for roof mounting or plumbing changes. Requirements vary by city and state, so check with your local building department before starting.
Will it work in winter or on cloudy days?
Evacuated tube collectors can still gather energy in cold or overcast conditions, though output drops. Most systems rely on a backup heater for the coldest or darkest periods.
Should I choose a direct or closed-loop system?
Direct systems are simpler but need potable-water-safe components and suit areas with freeze protection needs handled differently. Closed loops with glycol protect the collectors in freezing climates and are more common where water is hard or the climate is cold.
How hot can the water get?
Stored water can reach high temperatures on sunny days, which is why a tempering or thermostatic mixing valve is recommended at the fixtures. Set limits according to the manufacturer and local code.
How long does a system like this last?
Lifespan depends on components, water quality, and maintenance. Owners often report that tanks, pumps, and controllers are the parts most likely to need service, while glass collectors can last many years when undamaged.
Can I install it myself?
Some homeowners handle parts of the project, but roof work, structural checks, and gas or electrical connections call for qualified professionals. Consult a licensed installer if you are unsure at any stage.
How do I know if my system is performing well?
Track the temperature rise between the collector and the tank on a sunny day and compare it with the manufacturer’s expected range. A sudden drop in output usually points to a sensor, pump, air, or shading issue.
Conclusion
A well-planned apricus solar hot water system can meet a large share of household hot water needs when it is sized, sited, and installed correctly. Start with your real daily demand, check the roof and shading carefully, and choose storage and controls that match your climate and water quality. Take safety seriously, verify the installation with testing, and bring in a licensed professional wherever the work touches the roof, structure, or plumbing code.
Ready to choose one?

About Emmett Caldwell
Emmett covers solar water heaters, comparing specs, features and long-term owner feedback to help readers choose with confidence.