By Emmett Caldwell
Installing a solar hot water system is a manageable project for a handy homeowner who plans carefully. By the end of this guide, you will know how to assess your site, mount collectors safely, connect the piping and storage tank, wire the controls, fill and purge the system, and test it before you rely on it. The steps below follow the order most builders use, and they call out the points where mistakes are most expensive to fix.
Before you start, read the local rules. Many jurisdictions require a permit and inspection for roof-mounted equipment or any work touching the potable water supply. Plumbing and electrical connections should follow your local code, and some tasks are best handed to a licensed professional. Treat this article as a general build reference, not a substitute for your local requirements.
Shopping for one? See our guide: 8 Best Solar Hot Water System Off Grid Picks for Homes (2026).
Step 1: Confirm the Site and Sizing
Start with the site. Collectors need unshaded exposure to the sun for most of the day, and in the Northern Hemisphere they generally face south. Check for trees, chimneys and neighboring structures that cast shadows in mid-morning and mid-afternoon, not just at noon. For an overview of how to evaluate this, see Site Assessment for a Solar Water Heater: Sun, Shade, Roof and Space.
Next, estimate how much hot water you use. Add up daily gallons for showers, dishwashing and laundry, then size the collector area and storage tank to match. How to Estimate Your Household Hot Water Needs Before Going Solar walks through the arithmetic. Undersized systems run out of hot water on cloudy days, and oversized systems waste money on capacity you never use.
Check the Roof or Mounting Structure
A filled collector and tank can weigh far more than an empty one, so confirm the roof or ground frame can carry the load plus wind and snow. Locate rafters with a stud finder or by inspection from the attic, and do not mount into roof sheathing alone. For guidance, read Roof and Structural Safety for Solar Water Heaters.
Step 2: Choose the System Type
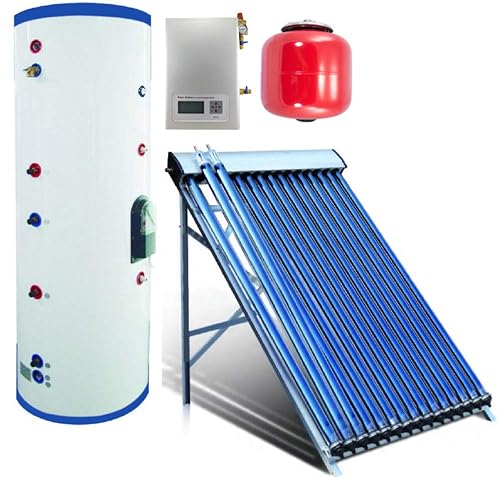
The system type drives the rest of the installation. A thermosiphon system relies on natural convection, so the storage tank sits above the collector, and no pump is needed. An active system uses a circulator pump and a controller, which lets the tank sit indoors or at a lower elevation. Thermosiphon Solar Water Heaters: Natural Circulation Explained covers the layout differences in detail.
Collector choice matters too. Flat plate collectors are common on residential roofs, evacuated tube collectors perform better in cold weather, and batch heaters are the simplest. Compare the options in Solar Water Heater Collectors: Batch, Flat Plate and Evacuated Tube.
Step 3: Gather Materials and Tools
Having everything on site before you start prevents half-finished work and rushed fittings. Typical materials for an active flat plate system include:
- Collector panels with mounting rails and hardware
- Roof flashings or ground mount brackets, rated for your wind zone
- Storage tank with the correct connection ports
- Circulator pump rated for the glycol and temperature range
- Differential controller and temperature sensors (collector and tank)
- Heat transfer fluid (propylene glycol for freeze protection) and a fill station
- Expansion tank, pressure relief valve and air vent
- Copper, PEX or CPVC piping rated for high temperatures, with insulation
- Isolation valves, check valves, drain valves and a flow meter
- Thermostatic mixing valve for scald protection
Tools typically include a drill and masonry bits, a tubing cutter, pipe wrench, crimp or press tools for your fitting type, a multimeter, a pressure gauge, a torque wrench for roof hardware, and a fluid pump for filling the loop. Pressure testing equipment is also important.
Step 4: Mount the Collectors
Set the collectors at a tilt close to your latitude for year-round performance, or steeper if winter heating matters more. Mount the rails first, check that they are level and square, and then attach the collectors. On a roof, use flashings that integrate with the shingles or roofing material, and seal every penetration. Keep the rails clear of ridges and valleys where water collects.
Flashing and Waterproofing
Most roof leaks around solar equipment happen at penetrations, not in the panels. Install each flashing with the upslope section under the shingles above and the downslope section over the shingles below. Use the sealant the manufacturer specifies, and check every fastener after the first heavy rain.
Step 5: Install the Storage Tank
Place the tank on a level, load-bearing base near the point where pipes are shortest. Keep it accessible for maintenance, and give room for the sacrificial anode or drain valve. If the tank is above the collector in a thermosiphon layout, the height difference determines the flow, so measure before fixing it in place.
Connect the cold inlet, hot outlet, and the collector loop ports according to the labels. Install a pressure relief valve on the tank, and route its discharge to a safe drain. Pressure and Temperature Safety in Solar Water Heaters explains the ratings you should check.
Step 6: Run the Piping
Keep runs short, straight and fully insulated. Slope the collector loop so air can travel toward the vent, and avoid low points where air or fluid can trap. Use high-temperature insulation on all hot lines and on the collector loop, especially where lines pass through unheated spaces. The full guide to materials and layout is at Piping for Solar Water Heaters: Materials, Insulation and Layout.
Pipe Sizing and Joints
Use the pipe diameter the manufacturer specifies for your flow rate, typically 3/4 inch for the loop in residential systems. Make joints according to the fitting type: soldered copper requires clean surfaces and lead-free solder rated for potable water, and PEX requires the correct crimp or expansion tool. Pressure test each section before insulating it.
Step 7: Wire the Controls and Sensors
A differential controller compares the collector temperature with the tank temperature and runs the pump only when the collector is hotter. Mount the collector sensor on the absorber plate or the outlet pipe, and mount the tank sensor low in the tank where it reads the water you use. Keep sensor wires away from high-voltage cables. Solar Water Heater Controls and Sensors: How Differential Control Works explains the logic.
Mount the pump with the shaft horizontal to avoid air pockets, and install it on the cooler return side of the loop when your manufacturer recommends it. Wire the pump through the controller using the wiring diagram supplied with your unit, and confirm the power source is correctly fused.
Step 8: Fill, Purge and Pressurize the Loop
Fill the collector loop with the heat transfer fluid using a fill pump, and purge air through the high-point vents. Run the pump in short bursts during purging to move trapped air to the vent. Set the expansion tank to the pre-charge pressure given in the manufacturer’s manual, and then bring the loop to its operating pressure. Recheck the fluid level and pressure after the first few sunny days, since air often shows up late.
| Check | Target | Why it matters |
|---|---|---|
| Loop pressure (cold) | As specified by manufacturer | Prevents air entry and leaks |
| Fluid freeze protection | Rated for lowest local temperature | Prevents burst collectors and pipes |
| Pump operation | Runs only when collector is hotter than tank | Avoids reverse heat loss |
| Tank relief valve | Discharge line clear and draining | Protects against overpressure |
Step 9: Test and Commission
Commissioning confirms the system works before you walk away. Check that the pump starts when the collector is sunny and stops at night, that the tank sensor reads correctly, and that no joint weeps under pressure. Record collector and tank temperatures at the same time on a clear day. Set the mixing valve so water at the tap stays within safe limits, and verify it with a thermometer at a faucet. Preventing Scalding From Solar Hot Water: Tempering Valves and Settings gives the recommended settings.
Common Mistakes
- Skipping the freeze-protection check in cold climates, which leaves the collector vulnerable to bursting.
- Forgetting to vent air from high points, which causes noisy pumps and poor flow.
- Using pipe, fittings or solder not rated for high temperatures.
- Placing the tank sensor too high, so the controller overheats the tank water.
- Leaving uninsulated hot lines, which waste heat before it reaches the taps.
- Mounting into roofing without proper flashing, a common cause of leaks.
- Skipping the water chemistry check; hard water scales collectors and heat exchangers. See Water Quality and Scaling in Solar Water Heaters.
Tips for a Smoother Install
Dry-fit the piping and collector connections before you solder or crimp anything. Take photos of the layout before you close up walls or insulation, since you will want them later. Label every valve and line so a future service technician can follow the system. If you are unsure whether your system needs a permit or inspection, check the rules in Solar Water Heater Codes, Permits and Professional Review before you begin.
Recommended gear
- Pipe insulation for high temperatures: Closed-cell or high-temperature foam sleeves keep heat in the loop, which is where most losses happen. View on Amazon
- Propylene glycol heat transfer fluid: Freeze-protected, food-safe glycol formulated for solar loops is the usual choice for closed-loop systems. View on Amazon
- Digital pressure gauge with a fill adapter: A gauge lets you confirm loop pressure during filling and after the first weeks of operation. View on Amazon
- Pipe crimping or press tool: Makes consistent, leak-tight PEX or press fittings faster than hand methods. View on Amazon
FAQ
How long does installing a solar hot water system take?
A confident DIY builder with a prepared site usually needs several weekends. Mounting, piping and insulation take the most time, and commissioning and fluid purging add a few more days.
Do I need a permit to install a solar hot water system?
Many areas require a permit, especially for roof work, electrical connections and potable water changes. Check with your local building department before starting.
Can I install the system myself?
Many homeowners complete parts of the work, such as mounting and insulation. Electrical, gas and any pressurized connections may need a licensed professional depending on local rules.
Which direction should the collectors face?
In the Northern Hemisphere they generally face south, and in the Southern Hemisphere they face north. Minor deviations are often acceptable, but large angles reduce output noticeably.
What tilt angle should I use?
A common starting point is a tilt close to your latitude. Steeper angles favor winter output, and shallower angles favor summer.
Why is my collector hot but the tank stays cool?
This often points to air in the loop, a failed pump, or a sensor placed incorrectly. Recheck the purge, the pump operation and the controller settings.
How do I protect the system from freezing?
Use a freeze-protected heat transfer fluid rated for your lowest local temperature, and follow the winter guidance in Winterizing a DIY Solar Water Heater: Freeze Protection Options. Consult a qualified professional if you are unsure of your freeze risk.
Conclusion
Installing a solar hot water system rewards careful planning. Confirm the site and the structure, choose the right system type, and build the loop with insulated, leak-tight piping. Purge, pressure-test and commission the system before you rely on it. Work within your local codes, and bring in a licensed professional for any step outside your skill or permit scope.
Ready to choose one?

About Emmett Caldwell
Emmett covers solar water heaters, comparing specs, features and long-term owner feedback to help readers choose with confidence.