By Emmett Caldwell
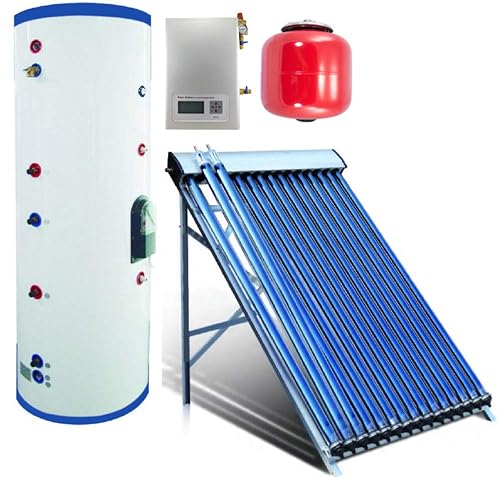
A solar hot water system on roof uses sun-facing collectors to heat water before it reaches your tank or your taps. By the end of this guide you will know how to judge whether your roof is suitable, how to choose collector type and orientation, how to size storage and piping, and what a safe mounting sequence looks like. The steps below are written for homeowners planning a DIY build or a hands-on install alongside a licensed professional.
Step 1: Confirm Your Roof Can Take the Load
Before you buy anything, verify the structure. A filled collector array and storage tank can weigh a good deal more than the empty components, and water weight is the number people underestimate. Check your rafters or trusses, their spacing and span, and whether the roof has been modified or re-roofed in ways that affect load capacity. For a deeper look at this step, see Roof and Structural Safety for Solar Water Heaters.
Shopping for one? See our guide: 8 Best Solar Hot Water System Off Grid Picks for Homes (2026).
If you are unsure about the structure, have a structural engineer or a qualified roofer review it. This is especially important on older homes, roofs with multiple layers of shingles, or any roof where you plan to drill through rafters.
Step 2: Assess Sun Exposure and Orientation
Collectors perform best when they face close to true south in the Northern Hemisphere and true north in the Southern Hemisphere. A roof pitch near your latitude is ideal for year-round output. Many installers use a rule of thumb of tilting the collector to roughly your latitude, plus or minus 15 degrees, depending on whether you favor winter or summer hot water.
Check for shading from trees, chimneys, neighboring buildings and even your own dormers. Track the sun over a full day at several points in the year, or use a solar pathfinder-style tool if you have access to one. Our full site assessment checklist is covered in Site Assessment for a Solar Water Heater: Sun, Shade, Roof and Space.
Step 3: Choose a Collector Type
Three collector styles dominate rooftop systems. Each suits different climates and roof conditions.
| Collector type | Typical strength | Typical limitation |
|---|---|---|
| Flat plate | Simple, durable, handles tilted roofs well | Heat loss increases in cold weather |
| Evacuated tube | Better performance in cold or cloudy conditions | More fragile, more components to replace |
| Batch (integrated storage) | Low complexity, no separate tank needed | Water can cool overnight in freezing climates |
For a comparison of how these work, read Solar Water Heater Collectors: Batch, Flat Plate and Evacuated Tube. If you are weighing a batch design specifically, 6 Best Batch Solar Hot Water Heater Options for Homeowners (2026) lists common models.
Step 4: Size Your Storage and Estimate Demand
Estimate daily hot water use in gallons per person, then size the storage tank to cover one to two days of demand on a typical sunny day. Many homeowners find that a tank in the 50 to 80 gallon range suits a small household, while larger families often need more. The method for working out real numbers is explained in How to Estimate Your Household Hot Water Needs Before Going Solar.
Storage type matters as much as volume. Look for tanks with adequate insulation, a properly rated pressure relief valve, and connections that suit your piping plan. More on tank options and safety parts is at Solar Hot Water Storage Tanks: Sizing, Types and Safety Parts.
Step 5: Plan the Piping and Circulation
There are two basic circulation approaches. A passive thermosiphon layout relies on hot water rising naturally into a tank mounted above the collector. An active system uses a small pump, usually controlled by a differential thermostat, to move fluid when the collector is hotter than the storage. Rooftop layouts often favor active circulation because the tank may sit inside the house.
Use insulated copper or cross-linked polyethylene lines rated for the temperatures you expect, typically well above 180°F at the collector. Keep runs short, slope lines consistently, and insulate every exposed section. Learn more in Piping for Solar Water Heaters: Materials, Insulation and Layout and Thermosiphon Solar Water Heaters: Natural Circulation Explained.
Step 6: Mount the Collectors Safely
- Locate and mark rafters using a stud finder and confirm each mounting point is structural.
- Install flashing kits designed for your roof covering before any penetration, so the roof stays watertight.
- Attach mounting rails or brackets to rafters with corrosion-resistant lag bolts, not into roof sheathing alone.
- Set collectors on the rails, check tilt and alignment with a level and a compass, and tighten all fasteners to the manufacturer’s torque specification.
- Route lines through the roof with proper boots or sleeves, and seal penetrations with compatible roofing sealant.
- Pressure-test the loop with water before insulating and before filling with heat transfer fluid, if your design uses one.
Work with fall protection, use a helper for heavy panels, and avoid roofing in wet or windy conditions. If any step feels beyond your comfort level, bring in a licensed roofer or installer.
Step 7: Install Controls and Safety Devices
A differential controller compares temperatures at the collector and the tank and switches the pump on only when useful heat is available. Pair it with a temperature sensor at the tank, a pressure relief valve sized to the tank, and an expansion tank where the design calls for it. Controls are explained in Solar Water Heater Controls and Sensors: How Differential Control Works.
Because stored water can exceed safe tap temperatures on sunny days, a thermostatic mixing valve is essential. See Preventing Scalding From Solar Hot Water: Tempering Valves and Settings for setpoints and placement.
Step 8: Commission, Test and Monitor
Once everything is connected, purge air from the loop, confirm the pump runs when the collector is hot, and check that the relief valve does not weep under normal operation. Run the system for several sunny days and watch tank temperatures. If you see unexpected results, the troubleshooting guide at Solar Water Heater Temperature Problems: Too Cold or Too Hot covers the most common causes.
Recommended gear
- Digital stud finder: Helps you locate rafters accurately before drilling, which keeps mounting hardware structural. View on Amazon
- Roof flashing kit for solar mounts: Keeps penetrations watertight when rails and lines pass through the roof covering. View on Amazon
- Digital torque wrench: Lets you tighten mounting fasteners to the manufacturer’s specification rather than by feel. View on Amazon
- Pipe insulation with UV-resistant jacket: Protects exposed rooftop lines from heat loss and sun damage. View on Amazon
Common mistakes
- Mounting into roof sheathing without hitting rafters, which can fail under snow or wind load.
- Skipping flashing or using the wrong sealant, leading to leaks that show up months later.
- Undersizing the tank, so the system runs out of hot water on cloudy days.
- Leaving hot lines uninsulated, which wastes heat before it reaches storage.
- Omitting a tempering valve, which can deliver scalding water to showers and sinks.
- Ignoring local codes and permits, which can complicate insurance claims and resale.
Tips for a Successful Rooftop Install
- Photograph the roof and mounting points before and after work for your records.
- Label every line and valve at the tank so future service is faster.
- Check permit and inspection requirements with your local building department early. The overview in Solar Water Heater Codes, Permits and Professional Review is a useful starting point.
- Plan for winter freeze protection in colder climates, using the options in Winterizing a DIY Solar Water Heater: Freeze Protection Options.
FAQ
Does a solar hot water system on roof need a south-facing roof?
In the Northern Hemisphere, a south-facing orientation gives the best annual output. East or west facing roofs can still work with a larger collector area, but expect lower output.
How much weight does a rooftop system add?
Weight depends on collector count, tank size and whether the tank is full. Water is heavy, so have a structural professional confirm loads before installation.
Can I mount the collectors myself?
Many homeowners do the work with proper planning, fall protection and correct hardware. Structural and roofing work carries real risk, so consider a licensed professional for any step you are not confident in.
Will a rooftop system work in freezing weather?
It can, with freeze protection such as drain-back designs, antifreeze loops or evacuated tubes. The right choice depends on your climate and design.
Do I need a tempering valve?
Yes, in most designs. Stored water can exceed safe tap temperatures, and a thermostatic mixing valve limits delivery temperature at the fixtures.
Do I need a permit?
Requirements vary by jurisdiction. Check with your local building department, since rooftop penetrations and plumbing work often trigger permit or inspection rules.
How long does a rooftop system last?
Well-built systems with quality components can run for many years. Expect to replace pumps, controllers and sealants on a schedule, and inspect the roof penetrations periodically.
Conclusion
A solar hot water system on roof is achievable when the structure, sun exposure and sizing are checked first. Choose a collector type that matches your climate, size storage to real demand, and mount everything into rafters with proper flashing. Finish with controls, a tempering valve and a monitored commissioning period. When in doubt about structure, electrical or plumbing work, consult a licensed professional.
Ready to choose one?

About Emmett Caldwell
Emmett covers solar water heaters, comparing specs, features and long-term owner feedback to help readers choose with confidence.