By Emmett Caldwell
A solar panels hot water system uses sunlight to heat water directly in a collector, then stores that heated water in an insulated tank for household use. In this guide you will learn how the system works, how to size it for your home, what materials to gather, and how to assemble and check a basic installation. The steps below focus on the common flat-plate and evacuated-tube arrangements that most homeowners and small builders work with.
How a Solar Panels Hot Water System Works
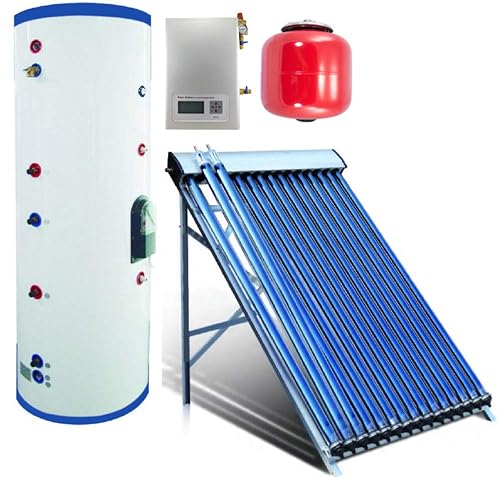
Unlike photovoltaic panels, which produce electricity, the collectors in a solar hot water setup absorb solar energy as heat and transfer it to a fluid. That fluid is either water itself, which is called a direct or open-loop system, or a heat-transfer fluid such as propylene glycol, which is called an indirect or closed-loop system. Closed-loop designs are common in climates that freeze, while direct systems are simpler and suit warmer regions.
Shopping for one? See our guide: 8 Best Solar Hot Water System Off Grid Picks for Homes (2026).
The basic cycle has four parts: a collector that heats the fluid, a pump or natural convection path that moves it, a storage tank that holds the heated water, and controls that decide when circulation should run. Understanding this loop makes every later decision easier, from pipe sizing to where you place the tank.
Direct vs. indirect circulation
In a direct system, potable water from the tank runs through the collector and back. This is efficient but exposes the collector to freezing and scale. An indirect system pumps glycol through the collector, passes it through a heat exchanger coil in the tank, and keeps drinking water separate. The extra parts add complexity but protect the collector in cold weather. For a first build, many people choose a thermosiphon or small direct system in a mild climate, then move to indirect designs as their needs grow.
Step 1: Estimate Your Hot Water Demand
Before buying any panel, work out how much hot water your household uses each day. A common starting point is to count daily uses of hot water (showers, dishwasher loads, laundry cycles, sink use) and multiply by the volume each one draws. A typical shower at a moderate flow rate can use around 15 to 20 gallons, while a dishwasher cycle and a washing machine load each draw less but add up quickly.
Once you have a daily total in gallons, you can size the collector area and storage tank. For more detail on this calculation, see How to Estimate Your Household Hot Water Needs Before Going Solar. Use a conservative total, because undersized systems leave occupants short on hot water during cloudy stretches.
Rough sizing rules
- Plan storage at roughly 1 to 1.5 times your average daily hot water use for a solar-first system with a backup heater.
- Estimate collector area by dividing your daily energy need by the solar energy your location receives per day, then adding a margin for losses.
- Remember that winter output can fall well below summer output, so size for your weakest month if you want year-round coverage.
Step 2: Choose a Collector Type
Most solar panels hot water system builds use one of three collector styles. Flat-plate collectors are durable, inexpensive per square foot, and tolerate a wide range of mounting angles. Evacuated-tube collectors perform better in cold or overcast conditions because the vacuum around each tube cuts heat loss. Batch or integrated collector-storage designs are the simplest, with the tank sitting inside or behind the glazing. Each has trade-offs in weight, freeze tolerance and install complexity.
If you are comparing ready-made options before deciding whether to build, the roundup at 9 Best DIY Solar Hot Water Heater Kits Compareds (2026) lists kit formats worth considering. For batch-style collectors specifically, 6 Best Batch Solar Hot Water Heater Options for Homeowners (2026) covers the main choices.
Step 3: Plan the Site and Mounting
Collectors need strong, unshaded sun for most of the day. In the Northern Hemisphere, a south-facing orientation is generally preferred, and a tilt roughly equal to your latitude gives good year-round performance. Trees, neighboring buildings and vent stacks can all cast shade, so check the site across the morning, midday and afternoon before committing.
Structural safety matters as much as sun exposure. Confirm that the roof or rack can carry the loaded weight of collectors, water and wind uplift. For guidance, read Roof and Structural Safety for Solar Water Heaters and Site Assessment for a Solar Water Heater: Sun, Shade, Roof and Space before drilling anything.
Step 4: Gather Materials and Tools
A basic installation typically requires the following. Quantities depend on your design, so treat this as a checklist rather than a shopping list.
- Solar collectors (flat-plate, evacuated-tube or batch units) sized to your calculation
- Insulated storage tank with appropriate pressure rating
- Copper or CPVC/PEX piping rated for the expected temperature and pressure, plus insulation sleeves
- Circulation pump and controller for closed-loop or forced systems (not needed for pure thermosiphon)
- Temperature sensors and a differential controller
- Pressure relief valve and temperature-and-pressure relief valve sized for the tank
- Thermostatic mixing valve to limit delivery temperature
- Expansion tank, check valves, isolation valves and drain valves
- Mounting rack, roof flashings and stainless fasteners
- Tools: drill, pipe cutter, soldering or press tools, torque wrench, multimeter, level, and a pressure gauge
Check local codes before you buy, since permits and required safety parts vary. See Solar Water Heater Codes, Permits and Professional Review for what to ask your building department.
Step 5: Plumb the System
Route the cold supply to the bottom of the storage tank and take the hot output from the top, following the manufacturer’s connection diagram. Keep pipe runs short and slope them to drain where freezing is possible. Insulate all hot and circulating lines, paying extra attention to outdoor and attic runs, since uninsulated pipe can lose a surprising share of collected heat.
Install the pressure and temperature relief valve with its discharge piped to a safe drain location. Include isolation valves so the collector loop can be serviced without draining the whole house. Pressure-test the completed loop before closing walls or covering insulation.
Piping tips
- Use the pipe material and fittings your design calls for; mixing dissimilar metals invites corrosion.
- Avoid low points that trap air, and add purge or air vents at high points.
- Follow the layout guidance in Piping for Solar Water Heaters: Materials, Insulation and Layout.
Step 6: Install Controls and Safety Devices
Controls turn circulation on when the collector is warmer than the tank and off when it is not, preventing reverse heat loss at night. A differential controller with two sensors is the standard approach. Mount the collector sensor on the absorber or outlet pipe and the tank sensor low in the tank, and seat each in a thermal well with contact paste.
Set a maximum tank temperature limit and make sure the system cannot overheat the storage or deliver scalding water to fixtures. A thermostatic mixing valve at the point of use is the usual solution. Compare options in Best Thermostatic Mixing Valves for Solar Hot Water: 5 Compared and read Preventing Scalding From Solar Hot Water: Tempering Valves and Settings for settings guidance.
Step 7: Commission and Test
Fill the system slowly to purge air, check every joint for leaks, and confirm pump operation if your design uses one. On a sunny day, watch the collector and tank sensor readings. The collector should climb in temperature once the sun hits it, and circulation should start once the difference reaches the controller’s set point. Confirm that the relief valve and mixing valve function as designed.
Common Mistakes to Avoid
- Undersizing storage. A small tank empties by evening, leaving no hot water when you need it most.
- Skipping insulation. Exposed pipe and tanks waste the heat you worked to collect.
- Ignoring freeze protection. Direct systems in cold climates can burst collectors. See Winterizing a DIY Solar Water Heater: Freeze Protection Options.
- Neglecting water quality. Hard water scales collectors and heat exchangers. Review Water Quality and Scaling in Solar Water Heaters.
- No scald protection. Always include a mixing valve or equivalent limit.
- Weak mounting. Wind uplift and snow load can move poorly anchored collectors.
- Mismatched sensors. Poor thermal contact gives false readings and erratic circulation.
Recommended gear
A few tools and accessories make the build more reliable and easier to check.
- Digital multimeter with temperature probe helps verify sensor readings and circuit continuity during commissioning. View on Amazon
- Pipe insulation sleeves reduce heat loss on exposed hot lines and help prevent freezing in cold areas. View on Amazon
- Thermal paste for sensor wells improves contact between the sensor and the pipe or tank wall, which makes control response more accurate. View on Amazon
- Pressure test pump kit lets you check every joint before the system is filled and closed in. View on Amazon
FAQ
Can a solar panels hot water system work in winter?
Yes, but output drops. Shorter days and lower sun angles reduce collection, so most homes keep a backup heater. Closed-loop designs with glycol and well-insulated storage perform better in cold months.
Do I need a backup heater?
In most climates, yes. A backup heater, whether electric, gas or heat pump, supplies hot water during cloudy periods and extended winter stretches. It can be a tank element or an inline unit controlled by the storage temperature.
How many panels do I need?
It depends on daily hot water use, local solar resource and the collector efficiency you choose. Calculate your daily energy need, then size the collector area with a margin. The sizing section above shows the approach.
Is a DIY solar hot water system safe?
It can be, when designed with proper pressure relief, temperature limiting and code-compliant plumbing. Scalding and overpressure are the main hazards. Because codes and safety requirements vary, consult a licensed professional, especially for grid-connected or permitted installations.
What is the difference between a solar panel and a solar hot water collector?
A photovoltaic panel converts sunlight to electricity. A solar hot water collector absorbs sunlight as heat and transfers it to water or a heat-transfer fluid. They are not interchangeable in a heating loop.
How long does a solar hot water system last?
Lifespan varies with materials, climate and maintenance. Owners often report that well-built collectors and tanks last many years, while pumps and controls may need earlier replacement. Regular checks of fluid levels, pressure and sensor function extend service life.
Can I connect solar hot water to my existing water heater?
Often yes, by installing a preheat tank or using the existing heater as the backup stage. Plumbing connections and controls must be designed so the backup heater does not fight the solar loop. Review your layout carefully before connecting.
Do I need a permit?
Many jurisdictions require permits for solar hot water installations, especially those that tie into the potable supply or the roof. Check with your local building department early.
Conclusion
A solar panels hot water system is built from a clear sequence: estimate demand, choose a collector type, plan the site, gather parts, plumb and control the loop, then commission it carefully. Sizing storage generously, insulating every hot line and installing proper scald and pressure protection prevent most problems. When in doubt about codes, structure or electrical work, bring in a licensed professional.
Ready to choose one?

About Emmett Caldwell
Emmett covers solar water heaters, comparing specs, features and long-term owner feedback to help readers choose with confidence.