By Emmett Caldwell
To install a solar hot water system, you will assess your site, mount the collector at the right angle, set up the storage tank and piping, wire the controls, add the safety parts, and then fill, purge and test the system. Done in that order, the job is manageable for a capable DIYer, and the finished system will deliver heated water to your taps without relying on a gas or electric heater for most of the year. This guide walks through each stage so you know what to do, what to buy, and where projects usually go wrong.
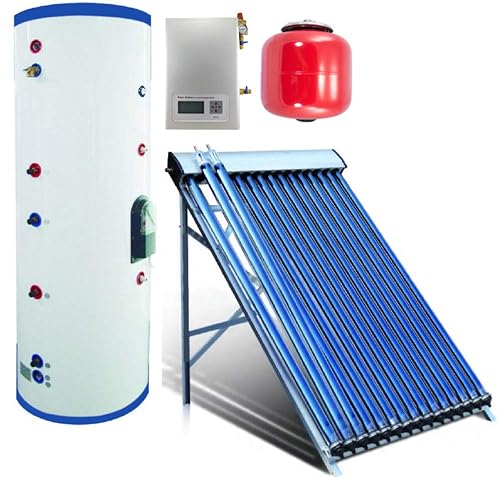
Before you start, understand that a solar hot water system is not a single product. It is a collector, a storage tank, a circulation method, a controller, and a set of safety devices working together. Some setups are passive, relying on the tank sitting above the collector, while others use a pump and sensors. The steps below apply to most active, closed-loop systems, but always follow the manufacturer’s manual for your specific equipment. For a broader look at the options, see Diy Solar Hot Water Heater: A Step-by-Step Build Guide for Beginners.
Shopping for one? See our guide: 8 Best Solar Hot Water System Off Grid Picks for Homes (2026).
Step 1: Assess the Site Before You Buy Anything
Site assessment decides whether the system will work at all. Spend time on this before ordering equipment, because the wrong orientation or shading can cut output sharply. Check sun exposure for a full day, noting when shadows from chimneys, trees and neighboring buildings fall across the roof or ground mount.
- Orientation: In the Northern Hemisphere, a collector facing true south performs best for year-round use. Facing east or west costs some output; facing north is generally not recommended.
- Tilt: A common rule of thumb is to set the tilt near your latitude. Many installers adjust this upward for winter-heavy loads and downward for summer-heavy loads.
- Shading: Even partial shade on one corner of a collector can reduce output more than you expect, depending on the design.
- Structure: Confirm the roof or mounting surface can carry the weight of a filled collector and tank. Filled water weight is substantial.
- Distance: Keep the run between collector and tank short. Long pipe runs lose heat and increase pumping demand.
For a deeper checklist, read Site Assessment for a Solar Water Heater: Sun, Shade, Roof and Space and Roof and Structural Safety for Solar Water Heaters. Structural questions are worth confirming with a licensed roofer or engineer, particularly on older buildings.
Step 2: Estimate Your Hot Water Demand
Sizing the system to your household is the next decision. Too small and you run out of hot water on cloudy days; too large and you pay for capacity you never use. Count daily hot water use by fixture, then size the storage tank to cover at least one day of demand with a margin for overcast weather. Our guide on How to Estimate Your Household Hot Water Needs Before Going Solar walks through the arithmetic.
Rough sizing reference
| Household size | Typical daily hot water use (gallons, approximate) | Common storage tank range (gallons) |
|---|---|---|
| 1 person | 15 to 25 | 30 to 40 |
| 2 people | 30 to 45 | 40 to 60 |
| 3 to 4 people | 50 to 80 | 60 to 80 |
| 5 or more | 80 and up | 80 and up, often split across tanks |
These figures are approximate and vary with fixture efficiency, habits and climate. Treat them as a starting point, not a final spec.
Step 3: Gather Tools and Materials
Having everything on hand before you start keeps the job from stalling halfway through a roof session. A typical install calls for the following.
- Collector(s), mounting brackets and roof flashing or ground frame, per manufacturer specs
- Storage tank with the ports, anode and insulation your design requires
- Circulation pump, controller and temperature sensors (for active systems)
- Copper, PEX or other piping rated for solar fluid and temperature, with insulation
- Heat-transfer fluid (propylene glycol, not automotive antifreeze) if using a closed loop
- Expansion tank, pressure relief valve, check valves, air vents and drain valves
- Thermostatic mixing valve for tempering hot water at the taps
- Drill, impact driver, level, tape measure, pipe cutters, press or solder tools as needed
- Pipe sealant, thread tape, solder or fittings suited to the pipe material
Check local codes before buying. Permits and inspections differ by jurisdiction, and Solar Water Heater Codes, Permits and Professional Review covers what to expect.
Step 4: Mount the Collector
Prepare the mounting surface
Locate rafters or structural members for roof mounts and mark them accurately. Install flashing according to the manufacturer’s sequence so water runs over, not under, each layer. Seal every penetration. On ground mounts, set footings below frost depth in cold climates and level the frame before you fasten anything.
Set the angle and secure the collector
Mount the collector at your chosen tilt and orientation. Use a level and a compass or GPS-based app to confirm alignment. Torque fasteners to spec. Wind loading is real, so fasten the collector to the mounts exactly as the manufacturer directs and do not substitute lighter hardware.
Step 5: Install the Storage Tank
Place the tank indoors or in a protected location close to the collector and to the point of use. Keep it level and provide clearance for service, especially around the anode rod and any heating element. Connect the cold water inlet and the hot water outlet according to the labeled ports. If you are plumbing into an existing water heater, isolate the old unit first and check for any requirements on the tank’s pressure rating.
Step 6: Run the Piping
Piping carries the heat-transfer fluid between collector and tank, and the potable water through the house. Keep solar loop piping separate from domestic water, and use materials rated for the temperatures the collector can reach on a sunny stagnation day, often well above 200°F. Piping for Solar Water Heaters: Materials, Insulation and Layout explains material choices in detail.
- Run supply and return lines with a continuous slope so air can migrate toward the high point vent.
- Insulate every exposed run of solar loop piping with UV-resistant insulation outdoors.
- Install isolation valves so the collector can be serviced without draining the whole system.
- Add drain valves at low points for winterization or maintenance.
- Install an air vent at the highest point, and check flow direction on every check valve.
Step 7: Wire the Controls and Sensors
Active systems use a differential controller that compares the temperature at the collector with the temperature at the bottom of the tank. When the collector is meaningfully hotter, the pump runs; when the difference narrows, it stops. Place the collector sensor on the absorber plate or outlet pipe per the manual, and place the tank sensor in its well near the bottom of the tank. Loose or poorly placed sensors cause most controller complaints. For more on how this works, see Solar Water Heater Controls and Sensors: How Differential Control Works.
Wiring to mains power should be done by a licensed electrician or as your local code allows. Use low-voltage sensor wire rated for the environment and keep it separated from line voltage where possible.
Step 8: Add the Safety Components
Safety devices are not optional extras. They protect the system from overpressure, overheating and scalding. At minimum you should have:
- A temperature and pressure relief valve on the storage tank, piped to a safe discharge location
- An expansion tank sized for the fluid volume, which absorbs thermal expansion
- A thermostatic mixing valve to limit delivered water temperature at fixtures
- Check valves and vents as described above
Scalding risk is real when storage temperatures run high. Preventing Scalding From Solar Hot Water: Tempering Valves and Settings covers how to set the mixing valve, and Pressure and Temperature Safety in Solar Water Heaters covers relief valve sizing and discharge. For mixing valves specifically, compare options in Best Thermostatic Mixing Valves for Solar Hot Water: 5 Compared.
Step 9: Fill, Purge and Pressure Test
Commissioning is where many first-time installs go wrong. Work through it slowly.
- Fill the closed loop with the correct fluid mix, using a fill pump or the system’s fill port. Never use automotive antifreeze in a potable-adjacent loop.
- Purge air from the high points while the pump runs. Trapped air causes noise, poor flow and dry-firing.
- Pressurize the loop to the level the manufacturer specifies, typically a modest static pressure, and hold it while you inspect every joint.
- Fill the domestic side and check every connection for leaks at working pressure.
- Confirm the pump runs when the collector is sunny and stops at night or when the difference drops below the set point.
- Verify the relief valve and mixing valve function as designed.
Recommended gear
The following supplies commonly help with installation work. Confirm compatibility with your specific system before buying.
- Pipe insulation for outdoor solar loops: UV-resistant closed-cell foam tubing protects lines from heat loss and weather. View on Amazon
- Propylene glycol heat-transfer fluid: A food-grade or RV-grade propylene glycol solution is the usual choice for closed solar loops. View on Amazon
- Pipe sealant and thread tape: Rated for potable water and suitable for the fittings in your system. View on Amazon
- Digital thermometer with probe: Useful for checking tank and collector temperatures during commissioning. View on Amazon
Common mistakes
- Skipping the site survey. Shading and wrong orientation are expensive to correct after mounting.
- Undersizing the expansion tank. Pressure spikes can lift relief valves or damage fittings.
- Trapping air. Missing vents at high points cause noisy, sluggish circulation.
- Using the wrong fluid. Automotive antifreeze contains toxic additives and is not suitable for solar loops.
- Running no mixing valve. Stored water can be hot enough to scald.
- Mis-placed sensors. A sensor not in good thermal contact produces false readings and erratic pump behavior.
- Ignoring freeze protection. In cold climates, plan drain-down or glycol protection from the start. Winterizing a DIY Solar Water Heater: Freeze Protection Options explains the choices.
Tips for a smoother install
- Dry-fit piping and wiring before soldering or gluing anything.
- Photograph each stage. Your records help with inspections and future repairs.
- Label every valve and line so future service is faster.
- Watch water quality. Hard water scales heat exchangers and pipes; see Water Quality and Scaling in Solar Water Heaters.
- Consider a professional review of the design, especially for roof-mounted systems and gas or electric backup integration.
If you are still deciding between a DIY build and a commercial system, Is a DIY Solar Water Heater Right for You? A Decision Guide can help you weigh the tradeoffs.
FAQ
Can I install a solar hot water system myself?
Many homeowners with solid plumbing and roof-work skills complete installs themselves, especially for simple systems. Roof structure, electrical wiring and gas connections often need a licensed professional, and local codes may require permits and inspections.
How long does installation take?
For an experienced installer working on a prepared site, a basic system can be completed in a few days. A first-time DIYer should expect a longer timeline, and weather can add delays for roof work.
Which way should the collector face?
In the Northern Hemisphere, true south is usually best. In the Southern Hemisphere, face the collector north. East or west orientation reduces output but can still work in some situations.
What tilt angle should I use?
A tilt close to your latitude is a common starting point. Adjust for seasonal demand: steeper for winter-heavy use, shallower for summer-heavy use.
Do I need a mixing valve?
Yes, in most cases. Storage temperatures can exceed safe tap temperatures, and a thermostatic mixing valve limits delivered water to a safe level.
What fluid should go in a closed solar loop?
Use a propylene glycol solution rated for solar or potable-adjacent use. Do not use automotive antifreeze.
How do I know the system is working?
On a sunny day, the collector should be noticeably warmer than the bottom of the tank, the pump should run during daylight hours, and the tank should rise in temperature over the day. A thermometer or the controller display will show these readings.
Conclusion
Installing a solar hot water system comes down to careful site work, correct sizing, sound mounting and piping, reliable controls, and complete safety protection. Take the commissioning steps slowly, check every joint and vent, and verify that the mixing and relief valves work. If any part of the structure, electrical or gas work is outside your experience, bring in a licensed professional.
Ready to choose one?

About Emmett Caldwell
Emmett covers solar water heaters, comparing specs, features and long-term owner feedback to help readers choose with confidence.