By Audrey Hayes
Updated November 2026
A gas boosted solar hot water system uses a solar collector array to preheat water, then passes that water through a gas booster that heats it to your final set temperature when the sun falls short. This guide explains how the two heat sources work together, which components you need, how to size the system for your household, and how to commission it safely. You will finish with a clear plan you can take to a licensed plumber or use as a reference if you are doing parts of the work yourself.
How a Gas Boosted Solar Hot Water System Works
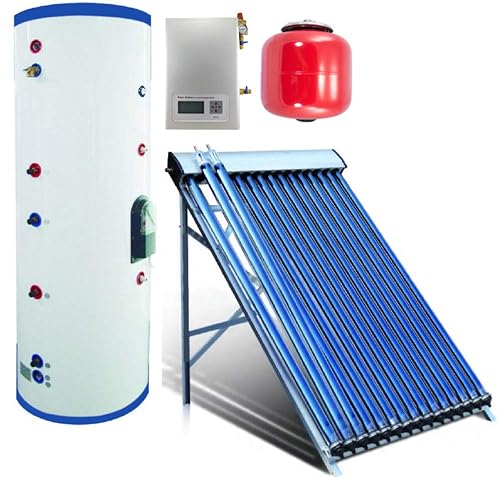
The solar side does most of the work on sunny days. Collector panels, usually flat plate or evacuated tube types, absorb sunlight and transfer heat to a fluid that circulates through a heat exchanger inside a storage tank. Cold mains water enters the bottom of the tank, picks up heat from the exchanger, and rises to the top where it is drawn off for use.
The gas booster sits downstream of the storage tank. When the water leaving the tank is below your target temperature, a gas burner or instantaneous heater raises it the remaining distance. On a clear day the booster may barely fire at all. On a cloudy or cold day, it carries the full load. This arrangement gives you consistent hot water without relying on sun alone.
The key design point is that the solar section and the gas section are separate. The gas unit does not heat the storage tank directly in most standard layouts, so solar gain is not lost to a burner sitting under the tank. Some systems add a gas-fired storage tank instead, which is a different configuration and should not be confused with a booster.
Core Components You Need
Before you buy anything, confirm the components are compatible with each other and with your local plumbing code. Mixing a collector loop fluid, tank heat exchanger, or controller from different manufacturers can cause pressure and temperature mismatches.
- Solar collectors: flat plate or evacuated tube panels mounted at an angle close to your latitude, facing as close to true south in the Northern Hemisphere as the roof allows.
- Solar storage tank: an insulated tank with an internal solar heat exchanger coil and a cold inlet at the base.
- Circulation pump and controller: a differential temperature controller that starts the pump when the collector is hotter than the tank bottom.
- Expansion vessel, pressure relief valve and check valves: needed on the closed solar loop to handle thermal expansion.
- Gas booster unit: a continuous-flow gas heater or a tank-type booster sized to your peak flow rate.
- Temperature sensors and mixing valve: a thermostatic mixing valve protects users from scalding at the outlet.
- Piping and fittings: copper or PEX rated for solar temperatures, plus insulation for all hot runs.
Step 1: Size the Solar Array and Storage Tank
Estimate Daily Hot Water Demand
Add up the hot water use for a typical day. A common planning figure for a household member is around 20 to 40 liters per person per day at 60 °C, but your own habits matter more than averages. Count showers, dishwashing and laundry separately.
Match Tank Volume to Demand
Most designers aim for a storage tank holding roughly one to one and a half days of demand, so a sunny day fills it and a cloudy day draws it down without running out. A household using 200 liters per day would typically look at a 200 to 300 liter solar tank.
Size the Collectors
Manufacturers publish collector area requirements per liter of tank volume for different climates. Use their tables rather than rules of thumb from other regions. Under-sized collectors make the gas booster run most of the year, which defeats the purpose.
Step 2: Plan the Gas Booster Placement and Capacity
The booster must be able to deliver your peak flow rate at the target temperature. Check the rated output in liters per minute at a given temperature rise. If your simultaneous demand is two showers plus a dishwasher, add those flow rates together before choosing a unit.
Install the booster on the hot outlet from the solar tank, with a temperature sensor on its inlet if the manufacturer recommends one. Keep the run short to limit heat loss. Place the gas unit where it can be vented to outdoors according to its installation manual, and maintain the clearances it specifies.
| Design factor | What to check | Why it matters |
|---|---|---|
| Peak flow rate | Sum of simultaneous fixtures | Booster must keep up at target temperature |
| Tank volume | 1 to 1.5 days of demand | Buffers cloudy spells |
| Collector area | Manufacturer table for your climate | Sets how often the booster fires |
| Gas supply | Line pressure and pipe diameter | Underpowered gas supply limits booster output |
| Venting | Clearances per manual | Required for safe combustion exhaust |
Step 3: Install the Solar Loop
Mount the Collectors
Secure collectors to the roof or a rack with stainless or galvanized hardware rated for wind loads in your area. Flash every penetration properly. Leaks at roof penetrations are one of the most common long-term failures.
Route and Insulate the Piping
Run supply and return lines with a consistent slope so air can bleed to the high point. Insulate all piping with UV-resistant insulation outdoors. Uninsulated hot runs can lose a surprising share of collected heat before it reaches the tank.
Fill, Purge and Pressurize
Fill the loop with the glycol-based heat transfer fluid specified by the collector maker, purge air through the high-point vents, and set the expansion vessel pre-charge to match the static fill pressure. Test the loop at operating pressure before insulating the final joints.
Step 4: Connect and Commission the Gas Booster
- Confirm gas line size and pressure match the booster’s nameplate requirements.
- Install a manual gas shutoff valve upstream of the booster.
- Connect the cold feed from the solar tank outlet and the hot outlet to the mixing valve.
- Wire the temperature sensors and controller according to the manufacturer diagram.
- Set the target temperature, commonly 50 to 60 °C at the mixing valve, and confirm the mixing valve limits outlet temperature.
- Run each fixture and check that the booster fires only when needed.
Gas work, including leak testing and venting checks, should be done or verified by a licensed gas fitter or plumber in most jurisdictions. Consult a professional before connecting gas lines.
Common Mistakes
- Undersized collectors: the booster ends up running most days, and the solar investment does little work.
- Skipping the mixing valve: storage tanks can exceed safe outlet temperatures on sunny afternoons.
- Poor booster placement: long pipe runs between tank and booster add standing losses and slow delivery.
- Ignoring the solar loop fluid: water in a freezing climate can burst collectors overnight.
- Wrong temperature setpoint: setting the booster too high wastes gas and increases scald risk.
- Undersized gas supply: the booster cannot reach rated output if the gas line is too narrow.
Tips for Better Performance
- Log the tank temperature and booster run hours for the first month to see whether your sizing matches real use.
- Insulate the storage tank and hot pipes thoroughly; standing losses add up over a year.
- Clean collector glass periodically, especially in dusty or pollen-heavy areas.
- Read the solar and gas sizing guides in Solar Hot Water System With Gas Booster: How to Set One Up Step by Step before finalizing your layout.
- Compare the alternatives in Solar Hot Water System vs Instantaneous Gas (2026): Which Should You Choose? if you are still deciding whether a booster is the right design for your home.
Recommended gear
A digital infrared thermometer helps you check outlet temperatures during commissioning without relying only on the controller display. View on Amazon
A solar-rated pipe insulation kit made for high-temperature hot water lines keeps losses low on exposed runs. View on Amazon
A digital pressure gauge with a fill adapter lets you set and verify the solar loop pressure before you close the system up. View on Amazon
FAQ
Does a gas boosted solar hot water system still work in winter?
Yes, but the booster will run more often because collector output drops with shorter days and lower sun angles. The system still reduces gas use compared with a gas-only heater if the array is sized for your climate.
Where should the gas booster go in relation to the solar tank?
In most designs the booster sits on the hot outlet of the solar tank, so it only heats water the solar side has already warmed. Keep the pipe run short and follow the manufacturer’s clearance and venting requirements.
Do I need a mixing valve?
Yes. A thermostatic mixing valve limits delivered water temperature, which matters because storage tanks can reach high temperatures on sunny days.
What fluid should go in the solar loop?
Use the propylene glycol-based heat transfer fluid specified by your collector manufacturer. Plain water is not appropriate in freezing climates and may not suit the collector materials.
How often should the system be serviced?
Check fluid pressure, pump operation, and booster combustion at least once a year, and have a licensed professional inspect gas components according to local requirements.
Can I install the gas booster myself?
Solar loop work is within reach of a capable DIYer, but gas connections, venting and final gas testing usually require a licensed gas fitter. Check your local codes before starting.
How do I know if the booster is firing too often?
Monitor booster run time over a few weeks. If it runs on most days, the collector area or tank volume is probably too small for your demand, or the controller setpoints need adjustment.
Conclusion
A gas boosted solar hot water system combines free solar heat with a reliable gas backup, so you get hot water on cloudy days without oversizing either component. Size the tank and collectors to your demand, plan the booster placement and gas supply carefully, and commission the system with a mixing valve and accurate temperature controls. Have gas work verified by a licensed professional, and review your system’s performance after the first few months.
Related reading
- Solar Hot Water System With Gas Backup: How to Set It Up Right
- What's the Best Solar Hot Water System? 3 Top Picks Compared (2026)
- What Is the Cheapest Solar Hot Water System? Options and Trade-Offs
- Top 5 Solar Thermal Storage Tanks for Home Hot Water Systems
Ready to choose one?
About Audrey Hayes
Audrey Hayes is part of our editorial team and reviews and edits our solar water heaters guides, checking product details against manufacturer specifications and owner feedback.