By Audrey Hayes
A flat plate solar hot water system uses a insulated, glazed panel to capture sunlight and transfer that heat into water, usually through a fluid loop and a storage tank. This guide walks you through how the system works, how to size it for your household, the components you will need, and the installation steps that matter most. By the end, you will know whether a flat plate system fits your site and what to check before you buy or build.
How a Flat Plate Solar Hot Water System Works
A flat plate collector is a shallow, rectangular box with a dark absorber plate inside, covered by one or two layers of tempered glass. Sunlight passes through the glass and warms the absorber. Tubes or channels bonded to the absorber carry a heat transfer fluid, or the water itself in direct systems, through the collector. The collector sits in an insulated backing so that heat moves toward the fluid rather than escaping into the roof or wall.
Shopping for one? See our guide: 8 Best Solar Hot Water System Off Grid Picks for Homes (2026).
Heat moves from the collector to the water in one of two ways. In a direct (open-loop) system, potable water flows through the collector and into the storage tank. In an indirect (closed-loop) system, a glycol-water mixture circulates through the collector and passes heat to the household water through a heat exchanger, often a coil inside the storage tank. Closed-loop designs are common in freezing climates because the antifreeze protects the collector. Circulation can be driven by a pump controlled by a differential thermostat, or by natural convection in a thermosiphon arrangement.
For a deeper look at how collector types compare, see Solar Water Heater Collectors: Batch, Flat Plate and Evacuated Tube. If you are deciding between this design and vacuum tubes, Flat Plate Solar Collector vs Evacuated Tube (2026): Which Should You Choose? covers the tradeoffs in more detail.
Step 1: Assess Your Site
Before you size anything, confirm that the site can support a collector. Most manufacturers specify a south-facing orientation in the Northern Hemisphere and a tilt roughly equal to your latitude, adjusted up or down depending on whether you want more winter or summer output. Shade from trees, chimneys or neighboring buildings during the middle hours of the day will cut output sharply.
- Measure the usable roof area and the distance from the collector location to the storage tank.
- Check for shading between roughly 9 a.m. and 3 p.m. across the seasons.
- Confirm that the roof framing can carry the added weight of a filled collector and mounting hardware.
- Note the water supply pressure and any local rules on pressure or temperature limits.
Work through the full checklist in Site Assessment for a Solar Water Heater: Sun, Shade, Roof and Space, and review Roof and Structural Safety for Solar Water Heaters before drilling anything into a roof.
Step 2: Estimate Your Hot Water Demand
Sizing starts with how much hot water your household uses per day. Count the people, then estimate daily use per person. Showers commonly run around 15 to 25 gallons per shower depending on the fixture, and dishwashing and laundry add more. Once you have a daily gallon figure, pick a storage tank that holds at least one day’s demand, and size the collector area so that a sunny day can heat that volume to your target temperature.
A common rule of thumb for flat plate systems in temperate climates is a collector area in the range of roughly 0.7 to 1.0 square meters per person, but local solar insolation changes this considerably. Treat rules of thumb as a starting point and check the numbers against your climate data. How to Estimate Your Household Hot Water Needs Before Going Solar walks through the calculation step by step.
Step 3: Choose Your Components
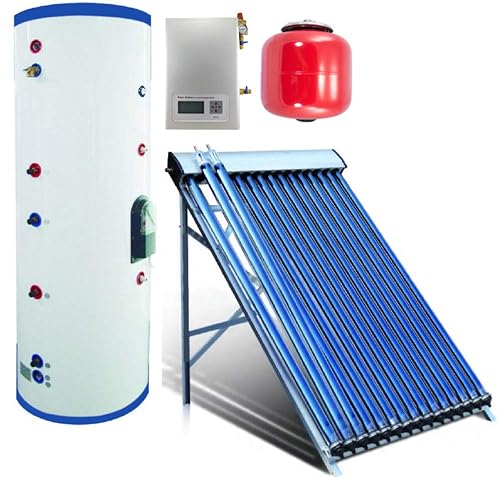
A complete flat plate system includes more than the collector. Plan for each of the following:
- Collector panels with a selective or high-absorptance coating, tempered glass, and rated insulation.
- Storage tank sized to your daily demand, with a heat exchanger coil if you are using a closed loop. Solar Hot Water Storage Tanks: Sizing, Types and Safety Parts explains the options.
- Circulation pump and controller with a differential thermostat, sensor wiring and, in closed loops, an expansion tank.
- Piping and insulation in copper or PEX rated for the fluid and temperatures involved. Insulate every exposed run. Piping for Solar Water Heaters: Materials, Insulation and Layout covers layout and materials.
- Safety devices: a pressure relief valve, a temperature and pressure relief valve on the tank, air vents, and a thermostatic mixing valve at the fixtures.
- Mounting hardware rated for your roof type and local wind loads.
Controls are where many first-time builds go wrong, so read Solar Water Heater Controls and Sensors: How Differential Control Works before you buy a controller.
Step 4: Install the Collector and Piping
Mount the Collector Securely
Fasten the mounting rails to the roof rafters, not just the sheathing, using lag bolts and flashing sealed at every penetration. Set the collector at the planned tilt and check that it is level side to side. Leave the connection ports accessible.
Run and Insulate the Piping
Keep pipe runs short and slope them so air can vent toward high points. Insulate all lines with UV-resistant insulation outdoors and wrap any exposed fittings. Install isolation valves and drain points so you can service the system without draining the whole loop.
Set the Tank and Heat Exchanger
Place the tank close to the collector loop and the main hot water demand if possible. Connect the cold feed, hot outlet, and solar loop ports according to the manufacturer’s labeling. Do not reverse the solar supply and return lines, which is an easy error to make.
Step 5: Commission and Test the System
Fill the loop slowly to purge air, then bleed air from all high points. Check the pressure gauge and confirm that the relief valves are set below the ratings of the tank and collector. Turn on the controller and verify that the pump starts when the collector sensor is warmer than the tank sensor by the set differential, and stops when the difference closes. Watch the temperatures over a sunny afternoon before you consider the system finished.
Materials and Tools Checklist
Use this as a pre-build list. Quantities depend on your design.
- Flat plate collector panels with mounting kit
- Storage tank with heat exchanger coil, or separate heat exchanger
- Circulation pump, differential controller and temperature sensors
- Copper or PEX piping, fittings and solder or crimp tools
- UV-resistant pipe insulation and insulation tape
- Glycol heat transfer fluid (closed loop only) and expansion tank
- Pressure relief valve, temperature and pressure relief valve, air vents
- Thermostatic mixing valve
- Roof flashing, lag bolts, sealant rated for outdoor exposure
- Drill, socket set, pipe cutter, level, multimeter, pressure gauge
Common Mistakes
- Undersizing storage. A small tank leads to early depletion and frequent reliance on backup heat.
- Ignoring shade. A partial shadow across one row of tubes can cut output more than expected.
- Skipping freeze protection. Any system exposed to freezing temperatures needs a closed loop, drainback design, or freeze protection controls. Winterizing a DIY Solar Water Heater: Freeze Protection Options compares the approaches.
- Poor air venting. Trapped air causes noise, pump failure and dry spots in the collector.
- Missing safety valves. Relief devices are not optional, and water temperature must be limited at the tap. Preventing Scalding From Solar Hot Water: Tempering Valves and Settings explains how to do this.
- Using untreated hard water without a plan. Scale builds up in heat exchangers and collectors over time. Water Quality and Scaling in Solar Water Heaters explains how to manage it.
Tips for a Reliable Build
- Log temperatures for the first two weeks so you can spot a sensor or pump fault early.
- Label every valve and pipe run; service is far easier when the system is documented.
- Check local codes and permit requirements before purchasing. Solar Water Heater Codes, Permits and Professional Review outlines what to ask.
- Consider a professional review of the electrical, pressure and roof work, even if you do the rest yourself. Consult a licensed plumber or electrician for those tasks.
FAQ
How much roof space does a flat plate system need?
It depends on household demand and climate. A typical single-family home often needs one to three panels, and the exact area should come from a demand and insolation calculation rather than a fixed number.
Does a flat plate system work in cold climates?
Yes, when designed with freeze protection. Closed-loop glycol systems and drainback designs are the most common approaches in cold regions.
Do I still need a backup water heater?
Most systems include an auxiliary heat source, such as an electric element or gas burner, for cloudy periods and peak demand. Plan for it even if it is rarely used.
What tilt angle should the collector use?
A tilt near your latitude is a common starting point. Steeper angles favor winter output and shallower angles favor summer. Check the manufacturer’s recommendations for your location.
Can I install a flat plate system myself?
Many homeowners handle mounting and piping, but roof penetrations, electrical work and pressure systems often require permits and licensed professionals. Confirm local requirements first.
How do I know if the system is working?
Compare the collector and tank temperatures on a sunny day. The collector should run noticeably hotter than the tank when the pump is operating, and the tank should climb steadily during daylight hours.
Why is my tank temperature too low or too high?
Low readings often trace to shading, air in the loop, or a weak differential setting. Excessive temperatures usually mean the controller or temperature limit is misconfigured. Solar Water Heater Temperature Problems: Too Cold or Too Hot covers diagnosis.
Are flat plate systems better than batch heaters?
They suit different needs. Flat plate systems separate collection from storage and handle more demand, while batch heaters are simpler and cheaper to build. 6 Best Batch Solar Hot Water Heater Options for Homeowners (2026) compares batch options.
Conclusion
A flat plate solar hot water system can supply a large share of household hot water when it is sited, sized and installed correctly. Start with the site assessment and a realistic demand estimate, then choose components that match your climate and safety requirements. Test thoroughly before you rely on the system, and bring in licensed professionals for the work that needs them.
Ready to choose one?
About Audrey Hayes
Audrey Hayes is part of our editorial team and reviews and edits our solar water heaters guides, checking product details against manufacturer specifications and owner feedback.