By Audrey Hayes
Updated November 2026
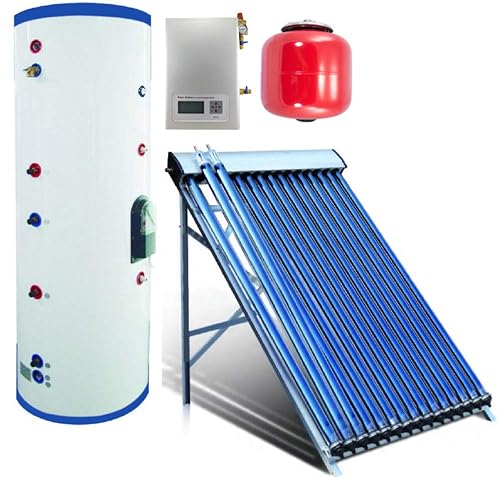
A solar thermal design guide walks you through the decisions that determine whether a solar water heater performs well: how much collector area you need, how to size the storage tank, how to tilt and orient the panels, and how to route the piping. By the end, you will have a rough design you can check against your household’s hot water use and your local sun exposure.
Step 1: Estimate Your Daily Hot Water Demand
Start with how much hot water you actually use. A common planning figure in the US is around 20 gallons per person per day at 120°F, but your own habits matter more. Count fixtures: a shower typically uses 10 to 20 gallons per use depending on flow rate, a dishwasher cycle several gallons, and a clothes washer on hot cycles more. Add these up for a typical day and use that number as your design load.
Shopping for one? See our guide: Top 7 Most Certified Solar Thermal Products in the U.S. Compared.
Step 2: Size the Collector Area and Storage Tank
Collector area depends on your sun hours and the temperature rise you need. Many installers plan around 1 to 1.5 square feet of collector per gallon of daily demand in sunny climates and somewhat more in cloudy regions. Storage tank volume is usually set at 1 to 1.5 times the daily hot water demand so the system can carry you through overcast days.
Run the numbers against your location’s solar insolation. Panels in a sunny Southwest location will need less area than the same household in the Pacific Northwest. For a deeper look at how storage fits into the system, see Top 5 Solar Thermal Storage Tanks for Home Hot Water Systems.
Step 3: Set Tilt, Orientation and Shading
Face collectors south in the Northern Hemisphere, with a small deviation toward east or west acceptable if roof geometry forces it. As a starting point, set the tilt close to your latitude. Raising the tilt by 10 to 15 degrees favors winter output, which is useful if your hot water need is steady year-round.
Check for shading from trees, chimneys and neighboring structures across the morning and afternoon hours. Even a partial shadow over one corner of a panel can reduce output more than most people expect.
Step 4: Plan the Piping and Circulation
Keep pipe runs short and insulated. Long, uninsulated runs lose heat before the water reaches the tank. Decide between a passive thermosiphon layout, which needs the tank above the collectors, and a pumped closed loop with a controller and sensors. Pumped systems give you more layout freedom but add components that need maintenance.
Sub-step: Locate the Temperature Sensor
Mount the collector sensor on the absorber outlet pipe, insulated, and the tank sensor low in the tank. Accurate readings drive the pump controller, so a misplaced sensor leads to poor performance.
Common Mistakes
- Undersizing the tank, which forces the backup heater to run early in the day.
- Ignoring freeze protection in cold climates, leaving the loop without antifreeze or drainback.
- Running uninsulated pipe through unheated spaces.
- Designing for peak summer sun only, then wondering why winter output is weak.
- Skipping a pressure relief valve and expansion tank in closed-loop designs.
Recommended Gear
- Pipe insulation sleeves cut heat loss on exposed runs. View on Amazon
- A digital differential thermostat controller manages pump start and stop based on collector and tank temperatures. View on Amazon
- Propylene glycol antifreeze protects closed-loop fluid in freezing climates. View on Amazon
FAQ
How many square feet of collector do I need for a family of four?
A family of four using around 80 to 100 gallons of hot water daily often plans for roughly 80 to 150 square feet of collector, depending on climate. Your local sun hours and the temperature rise you need will shift the number, so run a site-specific calculation.
Can I use a standard water heater tank for solar storage?
Yes, many DIY builds use a standard electric or gas tank with extra connections added, but the tank must be rated for the pressures and temperatures involved. Confirm ratings with the manufacturer before modifying it.
Do I need a professional to design a solar thermal system?
Simple thermosiphon systems can be planned by careful DIYers, but pressurized systems, roof loads and electrical connections should be reviewed by a licensed professional or qualified installer. Local codes often require permits.
Conclusion
A solid solar thermal design starts with honest hot water demand, sized collector area and storage, and careful attention to tilt, shading and piping. Work through each step with your local sun data in hand. Check the final layout with a qualified installer before you commit to materials.
Related reading
- Passive Solar Design Thermal Mass: A Step-by-Step Guide for Builders
- Worcester GreenSkies Solar Thermal Panels: 5 Best Options Compared
- Why Are Integrated Solar Thermal Panels Underperforming? 5 Causes and Fixes
Ready to choose one?
About Audrey Hayes
Audrey Hayes is part of our editorial team and reviews and edits our solar water heaters guides, checking product details against manufacturer specifications and owner feedback.