By Audrey Hayes
Updated November 2026
A stainless steel solar hot water system uses a stainless steel storage tank and, in many designs, stainless steel heat exchanger coils or piping to heat potable water from the sun. By the end of this guide, you will know how the main components fit together, how to pick the right stainless grade, how to size the collector and tank for a household, and how to avoid the errors that most often leave DIY builders with lukewarm water and corroded fittings.
How a Stainless Steel Solar Hot Water System Works
Most residential systems are either direct (open-loop), where potable water circulates through the collector, or indirect (closed-loop), where a heat-transfer fluid such as propylene glycol carries heat through a heat exchanger into the tank. Stainless steel earns its place in both designs because it resists corrosion from warm, oxygenated water and can handle repeated heating and cooling cycles without degrading as quickly as mild steel.
Shopping for one? See our guide: 6 Best Indirect Solar Hot Water System Options for Homes (2026).
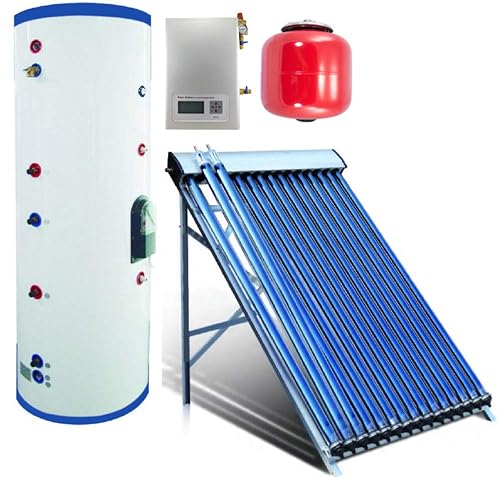
A typical setup includes a collector array, a circulation pump or thermosiphon loop, a storage tank, a controller with temperature sensors, and an expansion tank with pressure relief. The stainless tank holds the heated water until it is drawn. In closed-loop systems, the stainless coil inside the tank transfers heat from the glycol loop without mixing the two fluids.
Why Stainless Instead of Galvanized or Glass-Lined Steel
Galvanized steel tanks corrode over time, especially where the zinc coating is scratched during installation. Glass-lined tanks can crack from thermal shock and typically rely on a sacrificial anode that needs periodic replacement. Stainless steel does not depend on a coating, so its performance is more predictable. The tradeoff is that not every stainless grade suits every water chemistry, which is why grade selection matters.
Choosing the Right Stainless Steel Grade
Stainless steel is not one material. The grade determines how well it resists chloride pitting, which is the main threat in hot water service. Manufacturers and certifying bodies typically reference the following grades for potable water tanks and heat exchangers.
| Grade | Typical use | Chloride tolerance | Notes |
|---|---|---|---|
| 304 (18/8) | Tanks and piping in soft to moderate water | Moderate | Common and widely available; watch chloride levels above roughly 200 mg/L |
| 316 / 316L | Coils and tanks in harder or chloride-rich water | Higher | Molybdenum improves pitting resistance; the L variant reduces sensitization during welding |
| Duplex (2205 type) | High-chloride or high-temperature conditions | High | Stronger than austenitic grades; usually found in commercial or specialty equipment |
Before buying, get your water tested for chloride, hardness and pH. Your local water utility publishes annual quality reports, and a licensed water testing lab can run a full panel. Coastal homes and areas with road-salt runoff generally need 316L or better.
Step-by-Step: Planning and Sizing Your System
Step 1: Estimate Daily Hot Water Demand
Add up daily use in gallons at your preferred temperature. A common planning figure for a US household is around 15 to 25 gallons per person per day, but your own habits matter more. Showers at a low-flow head use far less than a standard head, and dishwashers and washing machines vary widely.
Step 2: Size the Collector Area
Solar thermal collectors are commonly sized by area. A widely used rule of thumb for flat-plate collectors in moderate climates is roughly 0.7 to 1.0 square meters per person, adjusted for latitude and sun exposure. Sunny southern regions can use less; northern or cloudy regions need more. Your installer or a local solar resource map can refine this number.
Step 3: Size the Storage Tank
Storage should hold about one to one-and-a-half days of demand so that cloudy days do not leave you without hot water. For a family of four using around 60 gallons per day, a 80- to 120-gallon stainless tank is a reasonable target. Oversizing wastes heat through standby losses, so avoid buying far more volume than you need.
Step 4: Choose the Mounting Location
Mount collectors facing true south in the Northern Hemisphere, tilted at an angle near your latitude for year-round use. The tank should sit as close to the collector loop as practical, ideally indoors or in a sheltered location to limit heat loss. Keep piping runs short and insulated.
Step-by-Step: Installation Basics
Tools and Materials Checklist
- Stainless steel storage tank with the correct connection sizes
- Flat-plate or evacuated-tube collectors rated for your climate
- Copper or CPVC-approved piping for the collector loop (check compatibility with your fluid)
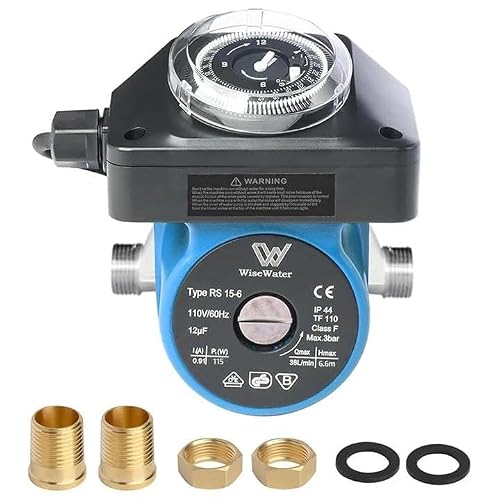
- Circulation pump rated for solar loop temperatures
- Differential temperature controller with sensors
- Pressure relief valve and expansion tank sized for the loop
- Pipe insulation rated for high temperatures
- Dielectric unions or fittings for any dissimilar metal joints
- Pipe cutters, press or solder tools, torque wrench, and a multimeter
- Roof flashing and mounting hardware rated for wind loads in your area
Step 5: Mount the Collectors Securely
Install roof rails or ground racking first, then set collectors. Use flashing kits made for your roof type, and seal penetrations properly. Check local wind-load requirements, since wind uplift is the main structural risk. Work safely on roofs and consider hiring a licensed roofer or solar installer for steep or high work.
Step 6: Plumb the Loop and Tank
Connect the collector outlet to the tank coil or heat exchanger inlet using insulated piping. Install a check valve and isolation valves so you can service components. Where stainless meets copper or galvanized steel, use dielectric unions to prevent galvanic corrosion. Include a temperature and pressure relief valve on the tank, piped to a safe discharge point.
Step 7: Fill, Purge and Pressure Test
Fill the loop, purge air through the high points, and pressure test to the rated limit before insulating. Check every joint. Air in a solar loop causes pump noise and poor flow, so purge thoroughly. Confirm the expansion tank pre-charge matches the static fill pressure.
Step 8: Set Controls and Verify Operation
Set the differential controller to start the pump when the collector is several degrees warmer than the tank bottom, and stop it when the difference narrows. Set a high-limit cutoff to protect the tank and fluid. Watch the system through a sunny afternoon and confirm the pump runs, temperatures climb, and the tank reaches its target.
Common Mistakes to Avoid
- Using 304 in high-chloride water. Pitting can perforate thin walls. Test your water first.
- Skipping dielectric unions. Direct contact between stainless and copper can accelerate corrosion at the joint.
- Undersizing the expansion tank. Glycol expands as it heats, and an undersized tank can cause relief valve discharge.
- Leaving air in the loop. Poor purging leads to noisy pumps, weak circulation and overheating.
- Insulating after a leak. Pressure test and inspect before covering pipe.
- Oversizing the tank. Extra volume increases standby heat loss and wastes collector output.
- Ignoring local code. Permits, backflow protection and roof penetration rules vary by jurisdiction.
Tips for Long-Term Performance
- Check glycol concentration and pH once a year, and replace the fluid per the manufacturer schedule.
- Clean collector glazing when dust or pollen builds up, especially in dry regions.
- Inspect fittings for weeping or green corrosion deposits during seasonal maintenance.
- Log tank temperatures for a few weeks after startup to spot underperformance early.
- Keep a gas or electric backup heater set to a lower setpoint than the solar tank so the solar system does the bulk of the work.
For more on how the individual parts fit together, see Solar Hot Water System Parts: A Step-by-Step Guide to Every Component (2026). If you are weighing a ready-made unit against a custom build, What's the Best Solar Hot Water System? 3 Top Picks Compared (2026) compares several complete packages. Builders who want to see tank options side by side can review Top 5 Solar Thermal Storage Tanks for Home Hot Water Systems. For a closed-loop layout with a backup heater, Solar Hot Water System With Gas Backup: How to Set It Up Right walks through the controls and plumbing. Finally, if you plan to mount on a roof, Solar Hot Water System on Roof: A Step-by-Step Guide to Planning and Mounting covers structural and flashing details.
Recommended gear
These items support the build and are widely used in solar thermal work. Confirm compatibility with your specific tank and fluid before buying.
- Solar differential temperature controller – Handles pump start and stop logic using two sensors, which is the core of any active solar loop. View on Amazon
- Propylene glycol solar thermal fluid – Designed for closed-loop systems and freeze protection, and safer for potable-adjacent loops than automotive coolant. View on Amazon
- Dielectric union fittings – Isolate dissimilar metals at connection points to reduce galvanic corrosion. View on Amazon
- Pipe insulation for high-temperature lines – Limits heat loss from the loop and protects against burns. View on Amazon
FAQ
Is a stainless steel solar hot water system better than a galvanized one?
In most cases yes, because stainless does not rely on a zinc coating that can wear off. Its real-world life still depends on water chemistry and correct grade selection.
Which stainless grade should I use for a DIY tank?
Use 316L if your water has elevated chlorides or is coastal. 304 can work in softer, low-chloride water. Test your water before deciding.
How much roof space does a typical system need?
It depends on collector area and layout. Sizing usually lands somewhere in the range of 0.7 to 1.0 square meters per person for flat-plate collectors, plus spacing for access and shading.
Do I need a backup heater?
Most homes do, because cloudy stretches and winter demand can outpace solar output. A backup heater set below the solar setpoint keeps the solar system doing most of the work.
Can I use water directly in the collector?
Open-loop designs do this, but they are limited to freeze-free climates and require careful water quality management. Closed-loop designs with glycol are more common where freezing occurs.
How often does the fluid need replacing?
Follow the manufacturer’s schedule, which often falls somewhere between several and ten years depending on fluid type and operating conditions. Test pH and glycol condition annually.
Should a licensed professional install my system?
Permits, electrical connections, gas work and roof penetrations often require licensed trades. Consult a professional before doing any work that touches gas lines, electrical circuits or structural roof components.
Conclusion
A stainless steel solar hot water system can deliver reliable, low-maintenance service when the grade, sizing and plumbing are matched to your water and household. Test your water, size the collector and tank to your real demand, and take care with purging, expansion and dielectric connections. Follow the controller and fluid schedules, and have a licensed professional handle any gas, electrical or structural work.
Ready to choose one?
About Audrey Hayes
Audrey Hayes is part of our editorial team and reviews and edits our solar water heaters guides, checking product details against manufacturer specifications and owner feedback.