By Audrey Hayes
Updated November 2026
A solar hot water tube system uses rows of glass evacuated tubes to capture sunlight and heat water that circulates to a storage tank. In this guide, you will learn how the system works, how to size it for your household, which parts you need, and the order of steps for a safe, reliable installation. Most of the work is plumbing and mounting, so a careful builder with basic tools can handle it with planning.
How a Solar Hot Water Tube System Works
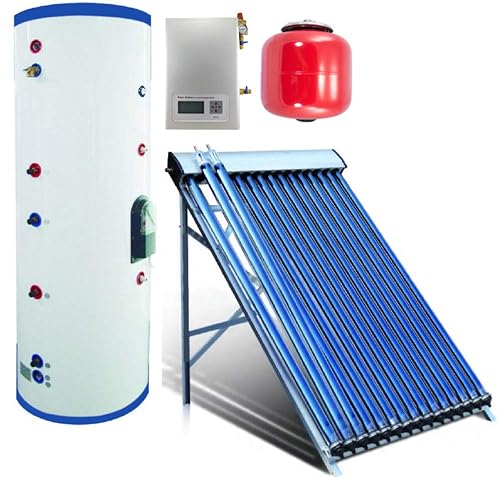
Each evacuated tube is a double-walled glass cylinder with the air removed from the gap between the walls. That vacuum cuts heat loss to the outside air, so the tube keeps absorbing energy even on cool, windy days. Inside each tube, a metal fin or coating absorbs sunlight and passes the heat into a fluid, either water directly or a heat-transfer fluid in a sealed heat pipe.
There are two common designs. In a direct (open-loop) system, potable water flows through the tubes and into the storage tank. In an indirect (closed-loop) system, a glycol-based fluid carries heat through a heat exchanger coil inside the tank. Indirect designs are the usual choice in freezing climates because the antifreeze protects the collector from frost damage. Direct systems are simpler and work well where freezing is rare.
Most residential setups pair the collector array with a insulated storage tank, a circulation pump or thermosiphon loop, a controller, and a backup heater. Manufacturers generally specify that the tank sit above the collector so that warm water rises naturally, though pumped systems relax that requirement.
Step 1: Estimate Your Hot Water Demand
Sizing starts with how much hot water your household uses per day. A common planning figure for a US home is about 20 to 25 gallons per person per day at 120°F, though actual use varies widely. Add up the fixtures: showers, dishwashers, clothes washers and sinks. Then decide what share of that load the solar system should cover. Many builders target 60 to 80 percent of annual hot water from solar, with a backup heater covering cloudy stretches and winter peaks.
Quick sizing checklist
- Number of occupants and average daily gallons per person
- Peak-day demand, such as guests or laundry days
- Local solar resource (average daily sun hours in your region)
- Target solar fraction (the percentage of hot water you want from solar)
- Available roof or ground space facing south (in the Northern Hemisphere) with minimal shading
Step 2: Choose the Collector and Storage Tank
Match the collector area to your daily load and local sun. Tube count is one way manufacturers express capacity, but the key figure is aperture area, usually listed in square feet. Compare the collector’s rated output against your sizing estimate rather than tube count alone.
Storage tanks for solar use are typically insulated and sized in gallons. A common pairing is roughly 1 to 1.5 gallons of storage per square foot of collector, though designers adjust this for climate and load. Look for a tank with a solar coil or a dedicated solar port, and confirm the pressure rating matches your plumbing.
Step 3: Gather Materials and Tools
Before you start, assemble everything so you are not stopping mid-job. Typical materials include:
- Evacuated tube collector array with manifold and mounting hardware
- Storage tank with solar connections
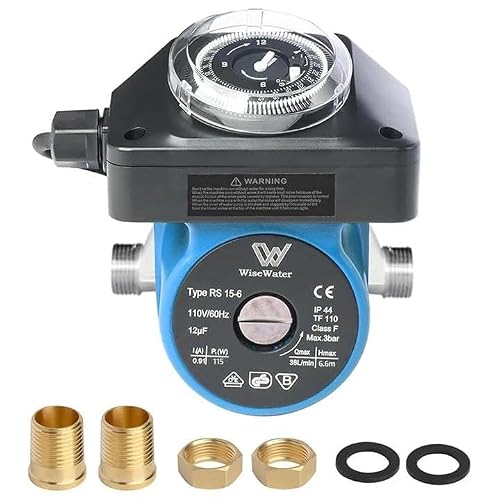
- Circulation pump, check valves and expansion tank (for pumped systems)
- Differential temperature controller with sensors
- Copper or PEX-rated high-temperature tubing and fittings
- Pressure relief valve rated for the system
- Insulation for piping and fittings (high-temperature rated)
- Roof flashing or ground mount hardware, sealant and fasteners
- Drain-back or pressure-relief components as required by your design
Tools usually include a drill and hole saw, pipe cutters, a torch or crimping tool for your pipe type, a level, a tape measure, a multimeter for wiring checks, and a pressure gauge for leak testing.
Step 4: Plan the Mounting Location
Tubes should face true south in the Northern Hemisphere, with tilt roughly equal to your latitude for year-round performance. Many installers use a slightly steeper angle to favor winter output. Check for shading from trees, chimneys and neighboring buildings across the entire day, not just midday. Confirm the roof structure can carry the added load, and plan a route for piping from the collector to the tank that keeps runs short and insulated.
If you are mounting on a roof, read the guidance on Solar Hot Water System on Roof: A Step-by-Step Guide to Planning and Mounting before you drill anything. Flashing and penetration details matter more than most builders expect.
Step 5: Mount the Collector Array
- Install the mounting rails or brackets, aligned square and level to the planned tilt.
- Set the manifold first, then attach tubes one at a time, following the manufacturer’s order and torque values.
- Seal all roof penetrations with flashing designed for the roof type, not generic caulk alone.
- Check that each tube is seated fully in its socket and that the manifold cap is secure.
Handle tubes carefully. A cracked tube loses its vacuum and must be replaced. Keep them covered until you are ready to install, and avoid dropping them during the lift.
Step 6: Plumb the Loop and Storage Connections
Run supply and return lines from the collector to the tank with consistent slope and insulation. Keep piping runs as short as practical. For pumped systems, install the pump on the cold return side where it is cooler, and include isolation valves so you can service it. Mount the expansion tank and pressure relief valve according to the manufacturer’s diagram.
Connect the cold water supply to the tank’s inlet, and the hot outlet to your home’s distribution. Keep the backup heater plumbed in series or parallel as your design requires, with its own thermostat control.
Pressure and leak testing
Before filling, pressurize the solar loop with water or the specified fluid to the rated test pressure and hold it for at least 30 minutes while you inspect every joint. Repair any drops before insulating the lines. Once filled, bleed air from the high points, since trapped air causes pump noise and poor circulation.
Step 7: Wire the Controller and Sensors
Mount the collector sensor on the manifold or a dedicated tube-side pipe, and the tank sensor low in the storage tank. The controller compares these temperatures and runs the pump when the collector is hotter than the tank by a set margin. Use the sensor types and wire gauge specified by the controller maker. Keep low-voltage sensor wiring away from line-voltage conductors. Electrical work should be inspected or performed by a licensed electrician where local code requires it.
Step 8: Commission and Monitor
Turn the system on during a sunny period and watch the temperatures for the first few days. Confirm the pump starts and stops at the expected differential, that the relief valve stays closed under normal operation, and that the backup heater engages only when needed. Log readings for a week to spot any problems early.
Common Mistakes
- Undersizing the collector. A system that barely covers summer use will fall short in winter and during extended cloudy spells.
- Ignoring shading. Partial shade on one tube can reduce output more than expected, depending on the manifold design.
- Poor insulation on piping. Uninsulated lines lose heat on the way to the tank, especially on long runs.
- Skipping freeze protection. In cold regions, a direct system without drain-back or antifreeze can crack components.
- Wrong pump placement or sizing. A pump that is too large or mounted in a hot spot shortens its life and wastes energy.
- Weak roof flashing. Leaks at penetrations cause damage that is hard to see until it is severe.
Tips for Better Performance
- Keep tubes clean. Dust and bird droppings reduce absorption, so an occasional rinse with plain water helps.
- Check the glycol level and pressure at least once a year in indirect systems.
- Set the backup heater thermostat low enough that it does not run when solar alone is sufficient.
- Insulate the tank and all exposed piping with materials rated for the temperatures involved.
Recommended gear
A good insulated pipe kit makes a visible difference to heat loss on long runs, and a quality differential controller is one of the most important components for keeping the pump working only when useful. For roof work, a proper flashing kit designed for your roofing material prevents the leaks that cause most long-term damage.
- Closed-cell foam pipe insulation rated for high temperatures, to limit heat loss on supply and return lines. View on Amazon
- Solar differential temperature controller with dual sensors, to run the pump only when the collector is warmer than the tank. View on Amazon
- Roof penetration flashing kit sized for your roofing type, to seal the mounting points against water entry. View on Amazon
- Digital pressure gauge with a test fitting, for the leak test before filling the loop. View on Amazon
FAQ
How much roof space does a solar hot water tube system need?
It depends on the collector size and tilt. Manufacturers list the aperture area and footprint for each model, and a standard residential array often needs enough clear south-facing space for several square meters of tubes, plus clearance for maintenance access.
Does a solar hot water tube system work in winter?
Yes, but output drops with shorter days and lower sun angles. Most homes keep a backup heater for winter, and the evacuated tubes’ insulation helps them perform better than flat-plate collectors in cold, cloudy conditions.
What is the difference between direct and indirect systems?
Direct systems circulate potable water through the tubes. Indirect systems circulate a glycol-based fluid through a heat exchanger in the tank. Indirect designs protect against freezing, while direct designs are simpler and suit warmer climates.
Can I install a solar hot water tube system myself?
Many experienced DIYers handle the mounting and plumbing, but electrical connections, roof structural checks and local permitting often require professional involvement. Check your local code and consult a licensed plumber, electrician or roofer where needed.
How often does a solar hot water tube system need maintenance?
Plan for an annual check of pressure, fluid level in indirect systems, controller operation and tube cleanliness. Inspect flashing and insulation at the same time. Manufacturers typically specify the exact intervals for their components.
How long do evacuated tubes last?
Manufacturers often publish service-life ranges for their tubes, but actual lifespan depends on hail exposure, freeze protection and installation quality. Inspect for cracks or lost vacuum during annual checks.
Should I compare this to other solar hot water options?
Yes. If you are weighing alternatives, read Solar Hot Water System vs Heat Pump (2026): Which Is Better for Your Home? to see how the choices compare for different climates and budgets.
Where can I find models to compare before buying?
Review the 6 Best Solar Hot Water System Vacuum Tube Options for Homes (2026) roundup for a side-by-side look at available collectors and their specifications.
Conclusion
A solar hot water tube system can supply a large share of your household hot water when it is sized correctly and installed with care. Start with an honest estimate of daily demand, choose a collector and tank to match, and plan the mounting and plumbing before you buy. Test every joint, commission carefully, and check the system once a year to keep it performing well. Consult a licensed professional for electrical work or structural questions.
Related reading
Ready to choose one?
About Audrey Hayes
Audrey Hayes is part of our editorial team and reviews and edits our solar water heaters guides, checking product details against manufacturer specifications and owner feedback.